


Running the Example▲
To run the example from http://, open the Welcome mode and select the example from Examples. For more information, visit http://.
Overview▲
QML Video Shader Effects demonstrates how a https:// can be used to apply postprocessing effects, expressed in GLSL, to QML https:// type.
It also shows how native code can be combined with QML to implement more advanced functionality - in this case, C++ code is used to calculate the QML frame rate. This value is rendered in QML in a semi-transparent item overlaid on the video content.
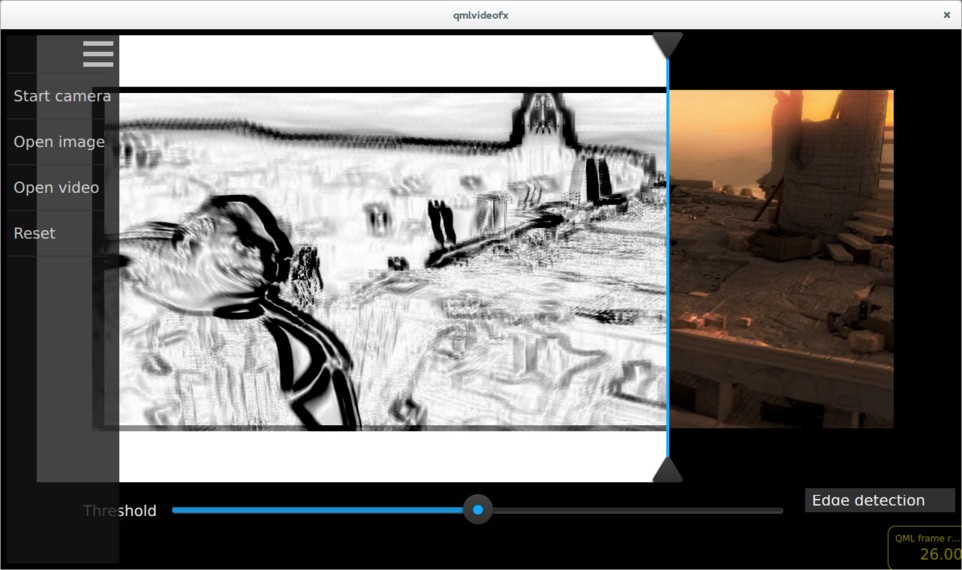
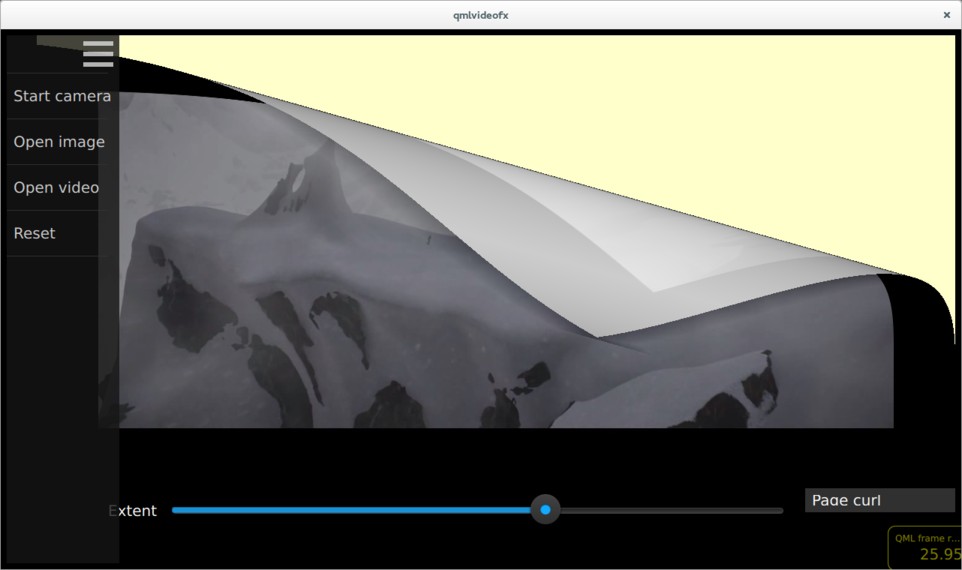
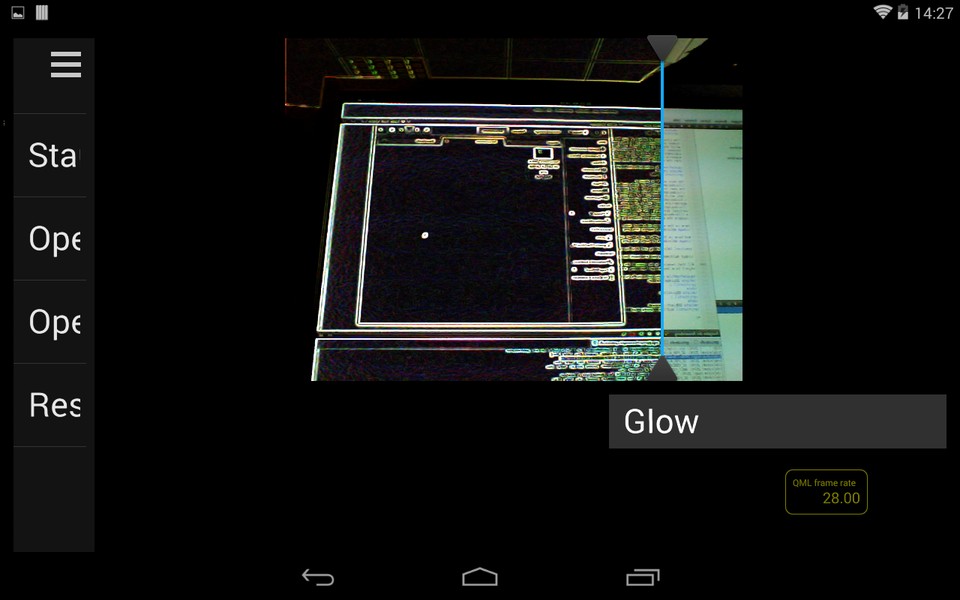
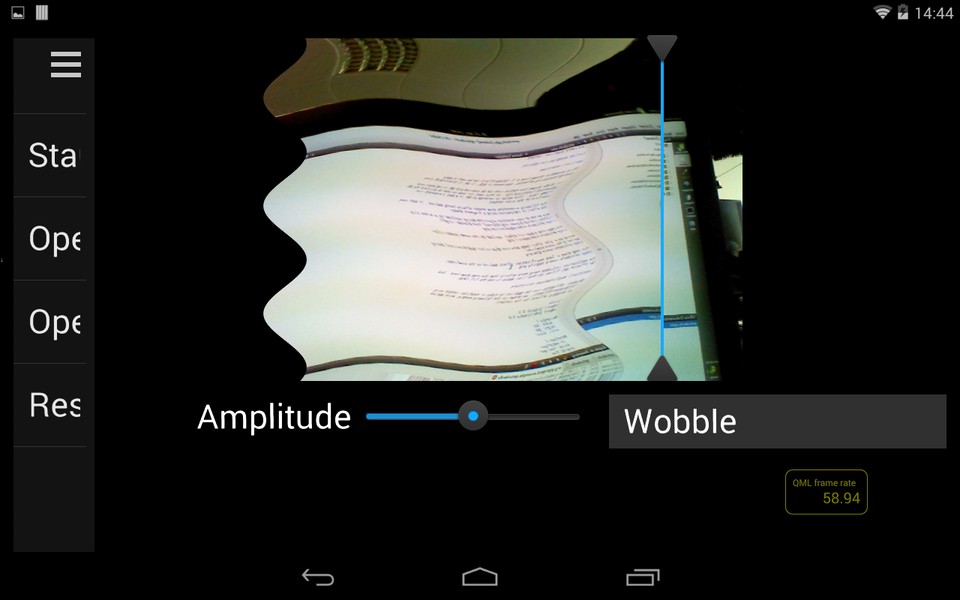
The following screenshots show shader effects being applied. In each case, the effect is implemented using a fragment shader.
Here we see an edge detection algorithm being applied to a video clip (http://).
This image shows a page curl effect, applied to the same video clip.
Here we see a 'glow' effect (edge detection plus colour quantization) being applied to the camera viewfinder.
This image shows a 'wobble' effect applied to the viewfinder.
The application includes many more effects than the ones shown here - look for Effect*.qml files in the list of files below to see the full range.
Application structure▲
Shader effects can be applied to video or viewfinder content using https://, as shown in the following example, which applies a wiggly effect to the content:
import QtQuick 2.0
import QtMultimedia 5.0

Rectangle {
    width: 300
    height: 300
    color: "black"

    MediaPlayer {
        id: mediaPlayer
        source: "test.mp4"
        playing: true
    }

    VideoOutput {
        id: video
        anchors.fill: parent
        source: mediaPlayer
    }

    ShaderEffect {
        property variant source: ShaderEffectSource { sourceItem: video; hideSource: true }
        property real wiggleAmount: 0.005
        anchors.fill: video

        fragmentShader: "
            varying highp vec2 qt_TexCoord0;
            uniform sampler2D source;
            uniform highp float wiggleAmount;
            void main(void)
            {
                highp vec2 wiggledTexCoord = qt_TexCoord0;
                wiggledTexCoord.s += sin(4.0 * 3.141592653589 * wiggledTexCoord.t) * wiggleAmount;
                gl_FragColor = texture2D(source, wiggledTexCoord.st);
            }
        "
    }
}
In this application, the usage of the https:// and https:// types is a bit more complicated, for the following reasons:
-
Each effect can be applied to either a https:// or an https:// item, so the type of the source item must be abstracted away from the effect implementation
-
For some effects (such as the edge detection and glow examples shown in the screenshots above), the transformation is applied only to pixels to the left of a dividing line - this allows the effect to be easily compared with the untransformed image on the right
-
Most effects have one or more parameters which can be modified by the user - these are controlled by sliders in the UI which are connected to uniform values passed into the GLSL code
The abstraction of source item type is achieved by the Content, which uses a https:// to create either a https://, https:// or https://:
import QtQuick 2.1

Rectangle {
    ...
    Loader {
        id: contentLoader
    }
    ...
    function openImage(path) {
        stop()
        contentLoader.source = "ContentImage.qml"
        contentLoader.item.source = path
    }

    function openVideo(path) {
        stop()
        contentLoader.source = "ContentVideo.qml"
        contentLoader.item.mediaSource = path
    }

    function openCamera() {
        stop()
        contentLoader.source = "ContentCamera.qml"
    }

}
Each effect is implemented as a QML item which is based on the Effect, which in turn is based on the https://:
import QtQuick 2.0

ShaderEffect {
    property variant source
    property ListModel parameters: ListModel { }
    property bool divider: true
    property real dividerValue: 0.5
    property real targetWidth: 0
    property real targetHeight: 0
    property string fragmentShaderFilename
    property string vertexShaderFilename

    QtObject {
        id: d
        property string fragmentShaderCommon: "
            #ifdef GL_ES
                precision mediump float;
            #else
            #   define lowp
            #   define mediump
            #   define highp
            #endif // GL_ES
        "
    }

    // The following is a workaround for the fact that ShaderEffect
    // doesn't provide a way for shader programs to be read from a file,
    // rather than being inline in the QML file

    onFragmentShaderFilenameChanged:
        fragmentShader = d.fragmentShaderCommon + fileReader.readFile(":shaders/" + fragmentShaderFilename)
    onVertexShaderFilenameChanged:
        vertexShader = fileReader.readFile(vertexShaderFilename)
}
The interface of Effect allows for derived effects to specify the number of parameters which they support (and therefore the number of sliders which should be displayed), and whether a vertical dividing line should be drawn between transformed and untransformed image regions. As an example, here is the implementation of the pixelation effect. As you can see, the pixelation effect supports one parameter (which controls the pixelation granularity), and states that the divider should be displayed.
import QtQuick 2.0

Effect {
    parameters: ListModel {
        ListElement {
            name: "Granularity"
            value: 0.5
        }
        onDataChanged: updateParameters()
    }

    function updateParameters()
    {
            granularity = parameters.get(0).value * 20.0;
    }

    // Transform slider values, and bind result to shader uniforms
    property real granularity: 0.5 * 20

    fragmentShaderFilename: "pixelate.fsh"
}
The main.qml file shows a FileOpen, which allows the user to select the input source and an EffectSelectionPanel item, which lists each of the available shader effects. As described above, a Content item is used to load the appropriate input and effect type. A Divider item draws the vertical dividing line, which can be dragged left / right by the user. Finally, a ParameterPanel item renders the sliders corresponding to each effect parameter.
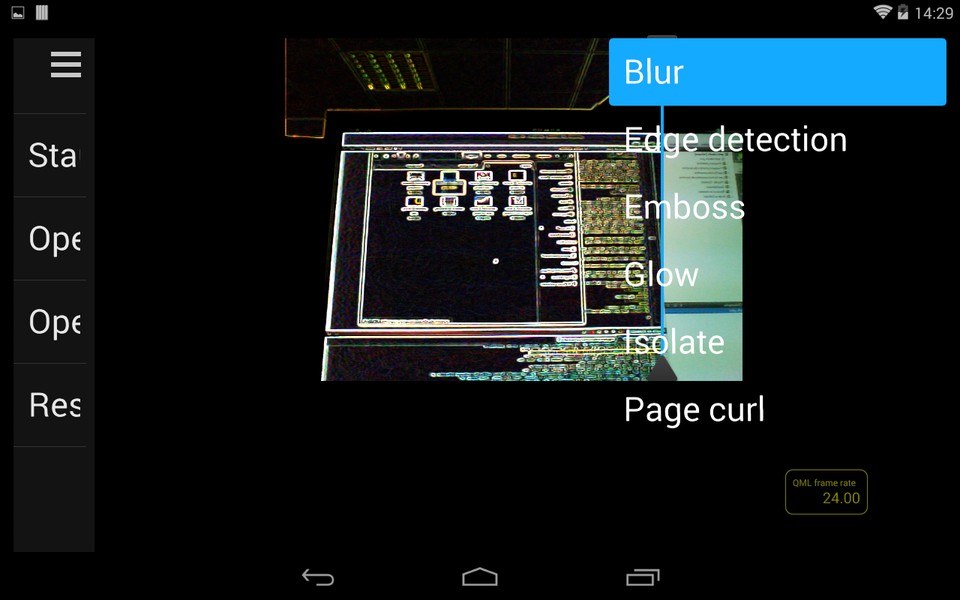
Here is the effect selection menu:
Calculating and displaying QML painting rate▲
The QML painting rate is calculated by the FrequencyMonitor class, which turns a stream of events (received via the notify() slot), into an instantaneous and an averaged frequency:
class FrequencyMonitor : public QObject
{
    Q_OBJECT
    Q_PROPERTY(qreal instantaneousFrequency READ instantaneousFrequency NOTIFY instantaneousFrequencyChanged)
    Q_PROPERTY(qreal averageFrequency READ averageFrequency NOTIFY averageFrequencyChanged)

public:
    ...
    static void qmlRegisterType();

public slots:
    Q_INVOKABLE void notify();
};
The FrequencyMonitor class is exposed to QML like this
void FrequencyMonitor::qmlRegisterType()
{
    ::qmlRegisterType<FrequencyMonitor>("FrequencyMonitor", 1, 0, "FrequencyMonitor");
}
and its data is displayed by defining a QML item called FrequencyItem, like this:
import FrequencyMonitor 1.0

Rectangle {
    id: root
    ...
    function notify() {
        monitor.notify()
    }

    FrequencyMonitor {
        id: monitor
        onAverageFrequencyChanged: {
            averageFrequencyText.text = monitor.averageFrequency.toFixed(2)
        }
    }

    Text {
        id: labelText
        anchors {
            left: parent.left
            top: parent.top
            margins: 10
        }
        color: root.textColor
        font.pixelSize: 0.6 * root.textSize
        text: root.label
        width: root.width - 2*anchors.margins
        elide: Text.ElideRight
    }

    Text {
        id: averageFrequencyText
        anchors {
            right: parent.right
            bottom: parent.bottom
            margins: 10
        }
        color: root.textColor
        font.pixelSize: root.textSize
    }
}
The result looks like this:

All that remains is to connect the afterRendering() signal of the https:// object to a JavaScript function, which will eventually call frequencyItem.notify():
#include <QtGui/QGuiApplication>
#include <QtQuick/QQuickItem>
#include <QtQuick/QQuickView>
#include "filereader.h"
#include "trace.h"

#ifdef PERFORMANCEMONITOR_SUPPORT
#include "performancemonitordeclarative.h"
#endif

int main(int argc, char *argv[])
{
    QGuiApplication app(argc, argv);
    ...
    QQuickItem *rootObject = viewer.rootObject();
    ...
    QObject::connect(&viewer, SIGNAL(afterRendering()),
                     rootObject, SLOT(qmlFramePainted()));
List of Files▲
Files:
List of Files▲
-
multimedia/video/qmlvideofx/filereader.cpp
-
multimedia/video/qmlvideofx/filereader.h
-
multimedia/video/qmlvideofx/main.cpp
-
multimedia/video/qmlvideofx/qml/qmlvideofx/Button.qml
-
multimedia/video/qmlvideofx/qml/qmlvideofx/Content.qml
-
multimedia/video/qmlvideofx/qml/qmlvideofx/ContentCamera.qml
-
multimedia/video/qmlvideofx/qml/qmlvideofx/ContentImage.qml
-
multimedia/video/qmlvideofx/qml/qmlvideofx/ContentVideo.qml
-
multimedia/video/qmlvideofx/qml/qmlvideofx/Curtain.qml
-
multimedia/video/qmlvideofx/qml/qmlvideofx/Divider.qml
-
multimedia/video/qmlvideofx/qml/qmlvideofx/Effect.qml
-
multimedia/video/qmlvideofx/qml/qmlvideofx/EffectBillboard.qml
-
multimedia/video/qmlvideofx/qml/qmlvideofx/EffectBlackAndWhite.qml
-
multimedia/video/qmlvideofx/qml/qmlvideofx/EffectEmboss.qml
-
multimedia/video/qmlvideofx/qml/qmlvideofx/EffectGaussianBlur.qml
-
multimedia/video/qmlvideofx/qml/qmlvideofx/EffectGlow.qml
-
multimedia/video/qmlvideofx/qml/qmlvideofx/EffectIsolate.qml
-
multimedia/video/qmlvideofx/qml/qmlvideofx/EffectMagnify.qml
-
multimedia/video/qmlvideofx/qml/qmlvideofx/EffectPageCurl.qml
-
multimedia/video/qmlvideofx/qml/qmlvideofx/EffectPassThrough.qml
-
multimedia/video/qmlvideofx/qml/qmlvideofx/EffectPixelate.qml
-
multimedia/video/qmlvideofx/qml/qmlvideofx/EffectPosterize.qml
-
multimedia/video/qmlvideofx/qml/qmlvideofx/EffectRipple.qml
-
multimedia/video/qmlvideofx/qml/qmlvideofx/EffectSelectionList.qml
-
multimedia/video/qmlvideofx/qml/qmlvideofx/EffectSepia.qml
-
multimedia/video/qmlvideofx/qml/qmlvideofx/EffectSharpen.qml
-
multimedia/video/qmlvideofx/qml/qmlvideofx/EffectShockwave.qml
-
multimedia/video/qmlvideofx/qml/qmlvideofx/EffectSobelEdgeDetection1.qml
-
multimedia/video/qmlvideofx/qml/qmlvideofx/EffectTiltShift.qml
-
multimedia/video/qmlvideofx/qml/qmlvideofx/EffectToon.qml
-
multimedia/video/qmlvideofx/qml/qmlvideofx/EffectVignette.qml
-
multimedia/video/qmlvideofx/qml/qmlvideofx/EffectWarhol.qml
-
multimedia/video/qmlvideofx/qml/qmlvideofx/EffectWobble.qml
-
multimedia/video/qmlvideofx/qml/qmlvideofx/FileBrowser.qml
-
multimedia/video/qmlvideofx/qml/qmlvideofx/FileOpen.qml
-
multimedia/video/qmlvideofx/qml/qmlvideofx/HintedMouseArea.qml
-
multimedia/video/qmlvideofx/qml/qmlvideofx/Main.qml
-
multimedia/video/qmlvideofx/qml/qmlvideofx/ParameterPanel.qml
-
multimedia/video/qmlvideofx/qml/qmlvideofx/Slider.qml
-
multimedia/video/qmlvideofx/qmlapplicationviewer/qmlapplicationviewer.cpp
-
multimedia/video/qmlvideofx/qmlapplicationviewer/qmlapplicationviewer.h
-
multimedia/video/qmlvideofx/qmlvideofx.pro
-
multimedia/video/qmlvideofx/qmlvideofx.qrc
-
multimedia/video/qmlvideofx/qmlvideofx.svg
-
multimedia/video/qmlvideofx/trace.h
List of Files▲
Images:
List of Files▲
-
multimedia/video/qmlvideofx/images/Dropdown_arrows.png
-
multimedia/video/qmlvideofx/images/Slider_bar.png
-
multimedia/video/qmlvideofx/images/Slider_handle.png
-
multimedia/video/qmlvideofx/images/Triangle_Top.png
-
multimedia/video/qmlvideofx/images/Triangle_bottom.png
-
multimedia/video/qmlvideofx/images/icon_BackArrow.png
-
multimedia/video/qmlvideofx/images/icon_Folder.png
-
multimedia/video/qmlvideofx/images/icon_Menu.png
-
multimedia/video/qmlvideofx/images/qt-logo.png
-
multimedia/video/qmlvideofx/qmlvideofx.png