


Qt Quick 3D - Custom Instanced Rendering▲
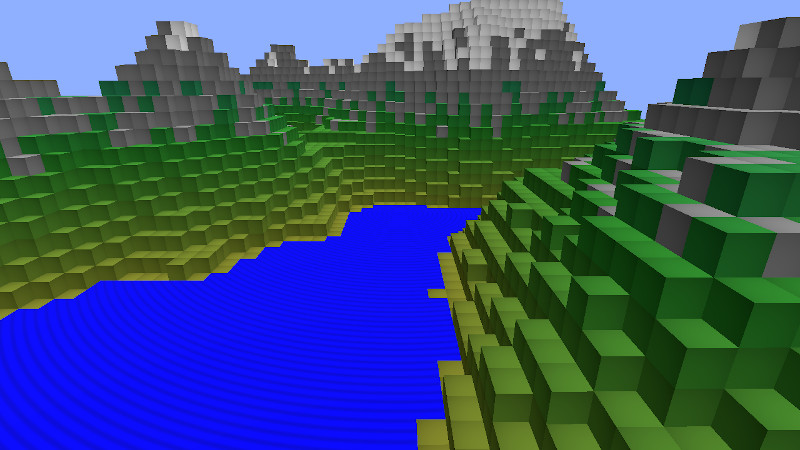
This example shows how to create instance data programmatically in C++, and how to use custom materials with instanced rendering.
Custom instancing table▲
We define our table as a subclass of https:// and add some properties so we can control it from QML:
class CppInstanceTable : public QQuick3DInstancing
{
    Q_OBJECT
    QML_ELEMENT

    Q_PROPERTY(int gridSize READ gridSize WRITE setGridSize NOTIFY gridSizeChanged)
    Q_PROPERTY(float gridSpacing READ gridSpacing WRITE setGridSpacing NOTIFY gridSpacingChanged)
    Q_PROPERTY(int randomSeed READ randomSeed WRITE setRandomSeed NOTIFY randomSeedChanged)
The virtual function https:// is reimplemented to return the instancing data:
QByteArray CppInstanceTable::getInstanceBuffer(int *instanceCount)
{
    if (m_dirty) {
        BlockTable blocks(m_gridSize, m_randomSeed);
        m_instanceData.resize(0);

        auto idxToPos = [this](int i) -> float { return m_gridSpacing * (i - m_gridSize / 2); };

        int instanceNumber = 0;
        for (int i = 0; i < m_gridSize; ++i) {
            float xPos = idxToPos(i);
            for (int j = 0; j < m_gridSize; ++j) {
                float zPos = idxToPos(j);
                int lowest = blocks.lowestVisible(i, j);
                int highest = blocks.highestBlock(i, j);
                for (int k = lowest; k <= highest; ++k) {
                    float yPos = idxToPos(k);
                    QColor color = blocks.getBlockColor(i, j, k);
                    float waterAnimation = blocks.isWaterSurface(i, j, k) ? 1.0 : 0.0;
                    auto entry = calculateTableEntry({ xPos, yPos, zPos }, { 1.0, 1.0, 1.0 }, {}, color, { waterAnimation, 0, 0, 0 });
                    m_instanceData.append(reinterpret_cast<const char *>(&entry), sizeof(entry));
                    instanceNumber++;
                }
            }
        }
        m_instanceCount = instanceNumber;
        m_dirty = false;
    }
    if (instanceCount)
        *instanceCount = m_instanceCount;

    return m_instanceData;
}
Custom material▲
We use a shaded custom material, meaning that Qt gives us the basic implementation, and we just specify additional logic.
The only customization we need for the vertex shader is for passing information to the fragment shader. By default, Qt only provides the instance data to the vertex shader, so we pass it on as vCustomData. We also calculate the global position of the vertex and make it available as vGlobalPosition.
// Copyright (C) 2023 The Qt Company Ltd.
// SPDX-License-Identifier: LicenseRef-Qt-Commercial OR BSD-3-Clause

VARYING vec4 vCustomData;
VARYING vec3 vGlobalPosition;
void MAIN()
{
    vCustomData = INSTANCE_DATA;

    // MODEL_MATRIX does not exist when instancing
    vec4 pos = INSTANCE_MODEL_MATRIX * vec4(VERTEX, 1.0);
    vGlobalPosition = pos.xyz;
}
The fragment shader performs a simple wave animation for water surfaces. Everything else gets a subtle radial gradient. The difference is determined by the first element of the custom data.
VARYING vec4 vCustomData;
VARYING vec3 vGlobalPosition;

void MAIN()
{
    METALNESS = 0.0;
    ROUGHNESS = 1.0;
    FRESNEL_POWER = 5.0;

    float c;

    if (vCustomData.x > 0)
        c = 1.0 - (1.0 + sin(sqrt(vGlobalPosition.x*vGlobalPosition.x + vGlobalPosition.z*vGlobalPosition.z) - uTime/200.0)) * 0.2;
    else
        c = 1.0 - 0.25 * (UV0.x*UV0.x + UV0.y*UV0.y);

    BASE_COLOR = vec4(c, c, c, 1.0);
}
Using the custom table and material in QML▲
We create a custom material using the shaders we made earlier, and add a new property uTime. This property is automatically mapped to the corresponding uniform in the fragment shader.
CustomMaterial {
    id: cubeMaterial
    property real uTime: frametimer.elapsedTime
    FrameAnimation {
        id: frametimer
        running: true
    }

    vertexShader: "cubeMaterial.vert"
    fragmentShader: "cubeMaterial.frag"
}
Finally, we create our model and apply the custom material and instance table:
Model {
    id: instancedCube
    property real cubeSize: 15
    scale: Qt.vector3d(cubeSize/100, cubeSize/100, cubeSize/100)
    source: "#Cube"
    instancing: CppInstanceTable {
        gridSize: 65
        gridSpacing: instancedCube.cubeSize
        randomSeed: 1522562186
    }
    materials: [ cubeMaterial ]
}
Note that we only create a single cube: All the heavy lifting is done by the GPU.
List of Files▲
Files:
List of Files▲
-
custominstancing/CMakeLists.txt
-
custominstancing/cppinstancetable.cpp
-
custominstancing/cppinstancetable.h
-
custominstancing/cubeMaterial.frag
-
custominstancing/cubeMaterial.vert
-
custominstancing/custominstancing.pro
-
custominstancing/main.cpp
-
custominstancing/main.qml
-
custominstancing/qml.qrc