


Qt Quick 3D - Simple Skinning Example▲
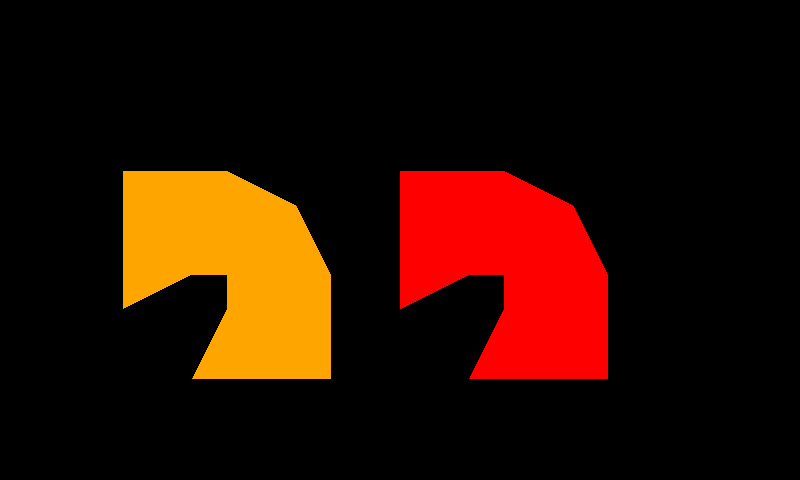
Generally most https:// will be designed by modeling tools, and Quick3D also supports glTF formats through the https:// and https://. This example shows how each property is used for the skin animation in Quick3D.
All the data in this example come from https://.
Make a skinning geometry.▲
To use custom geometry data, we will define a geometry having positions, joints, weights, and indexes.
Q_OBJECT
QML_NAMED_ELEMENT(SkinGeometry)
Q_PROPERTY(QList<QVector3D> positions READ positions WRITE setPositions NOTIFY positionsChanged)
Q_PROPERTY(QList<qint32> joints READ joints WRITE setJoints NOTIFY jointsChanged)
Q_PROPERTY(QList<float> weights READ weights WRITE setWeights NOTIFY weightsChanged)
Q_PROPERTY(QList<quint32> indexes READ indexes WRITE setIndexes NOTIFY indexesChanged)
Each position is a vertex position and each vertex has 4 joints' indexes and corresponding weights.
Set up skinned data in QML▲
Position data and indexes▲
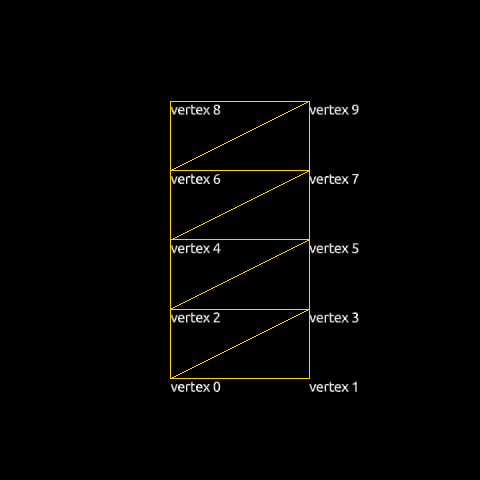
We will draw 8 triangles with 10 vertexes. The table below shows the QML code and a visualization of the vertexes.
|
QML Code |
Visualized |
|---|---|
|
Sélectionnez |
 |
Joints and weights data▲
Every vertex needs to specify the indexes of the joints that should have an influence on it during the skinning process. For each vertex we store these indexes as 4D vectors (Qt limits the number of joints that may influence a vertex to 4). Our geometry will have just two joint nodes (0 and 1), but since we use 4D vectors we set the remaining two joint indexes and their weights to 0.
joints: [
    0, 1, 0, 0, // vertex 0
    0, 1, 0, 0, // vertex 1
    0, 1, 0, 0, // vertex 2
    0, 1, 0, 0, // vertex 3
    0, 1, 0, 0, // vertex 4
    0, 1, 0, 0, // vertex 5
    0, 1, 0, 0, // vertex 6
    0, 1, 0, 0, // vertex 7
    0, 1, 0, 0, // vertex 8
    0, 1, 0, 0  // vertex 9
]
Corresponding weight values are as below.
weights: [
    1.00, 0.00, 0.0, 0.0, // vertex 0
    1.00, 0.00, 0.0, 0.0, // vertex 1
    0.75, 0.25, 0.0, 0.0, // vertex 2
    0.75, 0.25, 0.0, 0.0, // vertex 3
    0.50, 0.50, 0.0, 0.0, // vertex 4
    0.50, 0.50, 0.0, 0.0, // vertex 5
    0.25, 0.75, 0.0, 0.0, // vertex 6
    0.25, 0.75, 0.0, 0.0, // vertex 7
    0.00, 1.00, 0.0, 0.0, // vertex 8
    0.00, 1.00, 0.0, 0.0  // vertex 9
]
Skeleton and Joint hierarchy▲
For skinning, we add a skeleton property to the https://:
skeleton: qmlskeleton
Skeleton {
    id: qmlskeleton
    Joint {
        id: joint0
        index: 0
        skeletonRoot: qmlskeleton
        Joint {
            id: joint1
            index: 1
            skeletonRoot: qmlskeleton
            eulerRotation.z: 45
        }
    }
}
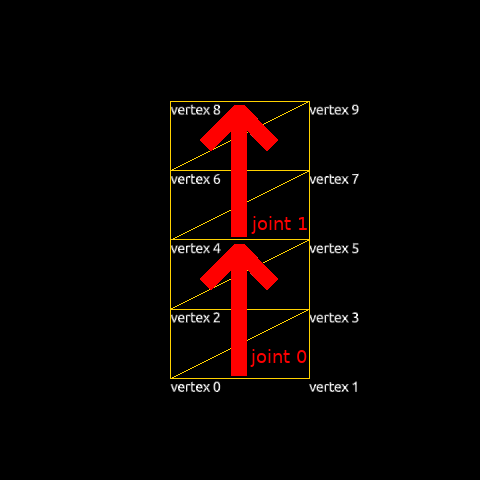
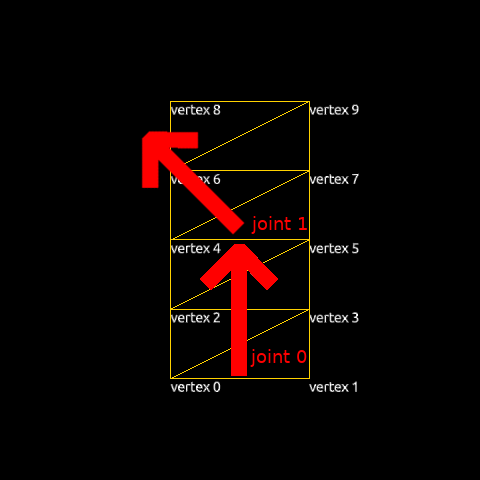
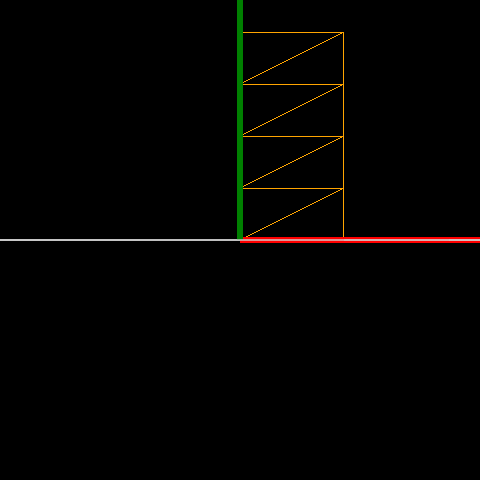
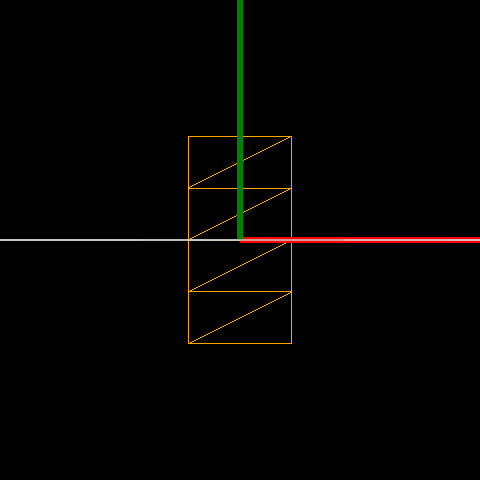
The two https://s are connected in a https://. We will rotate joint1 45 degrees around the z-axis. The images below show how the joints are placed in the geometry and how the initial skeleton is oriented.
|
Joints in the geometry |
Initial skeleton |
|---|---|
 |
 |
Placing models using inverseBindPoses▲
Once a model has a valid https://, it is necessary to define the initial pose of the skeleton. This defines the baseline for the skeletal animation: moving a joint from its initial position causes the model's vertexes to move according to the joints and weights tables. The geometry of each node is specified in a peculiar way: https:// is set to the inverse of the matrix that would transform the joint to its initial position. In order to move it to the center, we will simply set the same transform for both joints: a matrix that translates -0.5 along the x-axis and -1.0 along the y-axis.
|
QML code |
Initial position |
Result |
|---|---|---|
|
Sélectionnez |
 |
 |
Animate with Joint nodes▲
Now that we have prepared a skinned object, we can animate it by changing the https://s' properties, specifically eulerRotation.
Timeline {
id: timeline0
startFrame: 0
endFrame: 1000
currentFrame: 0
enabled: true
animations: [
TimelineAnimation {
duration: 5000
from: 0
to: 1000
running: true
}
]
KeyframeGroup {
target: joint1
property: "eulerRotation.z"
Keyframe {
frame: 0
value: 0
}
Keyframe {
frame: 250
value: 90
}
Keyframe {
frame: 750
value: -90
}
Keyframe {
frame: 1000
value: 0
}
}
}A more complete approach to skinning▲
Skeleton is a resource but it's hierarchy and position is used for the Model's transformation.
Instead of a https:// node, we can use the resource type https://. Since the https:// type is not a spatial node in the scene, its position will not affect the model. A minimal working Skin node will normally consist of a node list, joints and an optional inverse bind matrices, inverseBindPoses.
Using the https:// item the previous example can be written like this:
skin: Skin {
id: skin0
joints: [
joint0,
joint1
]
inverseBindPoses: [
    Qt.matrix4x4(1, 0, 0, -0.5,
                 0, 1, 0, -1,
                 0, 0, 1, 0,
                 0, 0, 0, 1),
    Qt.matrix4x4(1, 0, 0, -0.5,
                 0, 1, 0, -1,
                 0, 0, 1, 0,
                 0, 0, 0, 1)
]
}From the code snippet we can see that the https:// only has two lists, a joints and an inverseBindPoses, which differs from the https:// approach, as it does not have any hierarchy and just uses existing node's hierarchy.
Node {
    id: joint0
    Node {
        id: joint1
        eulerRotation.z: 45
    }
}
List of Files▲
Files:
List of Files▲
-
skinning/CMakeLists.txt
-
skinning/SimpleSkinning.qml
-
skinning/SimpleSkinningNew.qml
-
skinning/main.cpp
-
skinning/main.qml
-
skinning/qml.qrc
-
skinning/skingeometry.cpp
-
skinning/skingeometry.h
-
skinning/skinning.pro