|
|


Qt Designer's Form Editing Mode
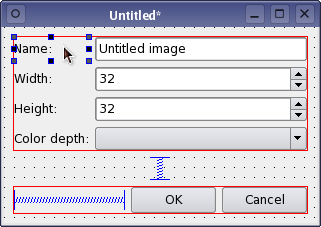 In Qt Designer's form editing mode, objects can be dragged from the main window's toolbox to a form, edited, resized, dragged around on the form, and even dragged between forms. Their properties can be modified interactively, so that changes can be seen immediately. The editing interface is intuitive for simple operations, yet still supports Qt's powerful layout facilities. Managing FormsQt Designer allows you to create and edit new forms (open the File menu and select New Form... or press Ctrl N). Existing forms can also be edited (open the File menu and select Open Form... or press Ctrl O). At any point, it is possible to save a form by selecting the Save Form As... option from the File menu. The .ui files saved by Qt Designer contain information about the objects used, and record the details of any signal and slot connections between them. Editing a FormBy default, new forms are opened in editing mode. If Qt Designer is in another mode, you can enter editing mode by opening the Edit menu and selecting Edit Widgets, or by pressing the F3 key. Objects are added to the form by dragging them from the main toolbox and dropping them in the desired location on the form. Once there, they can be moved around simply by dragging them. Objects can be selected by clicking on them using the left mouse button. The toolbox contains objects in a number of different categories, all of which can be simply placed on the form as required. The only objects that require a little more preparation are the Container widgets. These are described in more detail in the chapter on Using Containers.
When selected, the normal clipboard operations can be performed on a widget to cut, copy, and paste it. All of these operations are recorded in an undo buffer to enable changes to be undone and redone as necessary. The shortcuts used to perform all of these actions are described in the table below.
All the above actions (apart from cloning) can be accessed via both the Edit and the form's context menu. These menus also provide a Select All function to select all the objects on the form. They also provide functions for laying out objects. Widgets are not unique objects; you can make as many copies of them as you need. To quickly duplicate a widget, you can clone it by holding down the Ctrl key and dragging it. This allows widgets to be copied and placed on the form much more quickly than with clipboard operations.
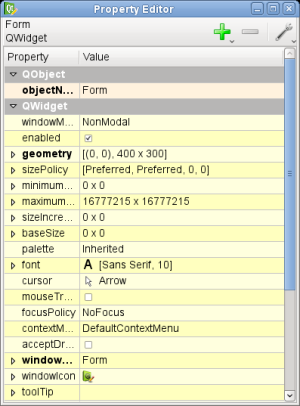
Qt Designer allows selections of objects to be copied, pasted, and dragged between forms. You can use this feature to create more than one copy of the same form, and experiment with different layouts in each of them. The Property EditorThe Property Editor always displays the properties of the currently selected object on the form. The properties available depend on the object being edited, but all of the widgets provided have common properties such as objectName (the object's internal name) and enabled (whether it can be interacted with).
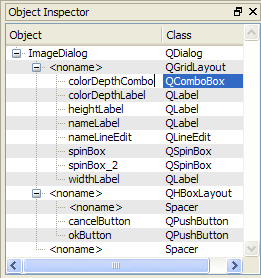
The Object InspectorThe Object Inspector shows an up-to-date hierarchical list of the objects (widgets, layouts, spacers, and other objects) on the form that is currently being edited.
LayoutsBefore the form can be used the objects on the form need to be placed into layouts, this ensures that they will be displayed properly when the form is previewed or deployed in an application. Placing objects in a layout also ensures that they will be resized correctly when the form is resized. Applying and Breaking LayoutsThe simplest way to manage objects is to apply a layout to a group of existing objects. This is achieved by selecting the objects that you need to manage and applying one of the standard layouts from the main toolbar, the Edit menu, or the form's context menu. Once widgets have been inserted into a layout, it is not possible to move and resize them individually because the layout itself controls the geometry of each widget within it, taking account of the hints provided by spacers. Instead, you must either break the layout (Ctrl+B or Break Layout) and adjust each object's geometry manually, or you can influence the widget's geometry by resizing the layout. You can also add and remove spacers from the layout to influence the geometries of the widgets.
The form's top level layout can be set by clearing the selection (click the left mouse button on the form itself) and applying a layout. Horizontal and Vertical LayoutsThe simplest way to arrange objects on a form is to place them in a horizontal or vertical layout. For example, the dialog shown at the beginning of this chapter contains two push buttons and a spacer that can be placed in a horizontal layout; this makes sure that the buttons remain next to each other when more layouts are added to the dialog. In the same way, vertical layouts ensure that each of the widgets within are aligned horizontally. Horizontal and vertical layouts can be combined, and nested to any depth. However, if you need more control over the placement of objects, you should consider using the grid layout. The Grid LayoutComplex form layouts can be created by placed objects in a grid layout. This kind of layout gives the form designer much more freedom to arrange widgets on the form, but can result in a much less flexible layout. However, for some kinds of form layout, a grid arrangement is much more suitable than a nested arrangement of horizontal and vertical layouts. Previewing FormsAlthough Qt Designer's forms are accurate representations of the components being edited, it is useful to preview the final appearance while editing. This feature can be activated by opening the Form menu and selecting Preview, or by pressing Ctrl+R when in the form. 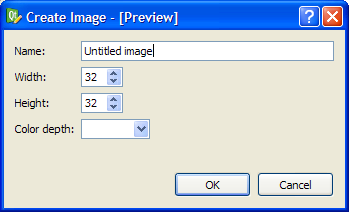 The preview shows exactly what the final component will look like when used in an application. [Previous: Designing a Component with Qt Designer] [Contents] [Next: Using Containers in Qt Designer] |
Publicitй
Best OfActualitйs les plus luesSemaine
Mois
Annйe

Le Qt Labs au hasard
QLocale : а propos du temps (et des dates, et des langues, et des...)Les Qt Labs sont les laboratoires des dйveloppeurs de Qt, oщ ils peuvent partager des impressions sur le framework, son utilisation, ce que pourrait кtre son futur. Lire l'article.
CommunautйRessources
Liens utilesContact
Qt dans le magazine |
| Cette page est une traduction d'une page de la documentation de Qt, йcrite par Nokia Corporation and/or its subsidiary(-ies). Les йventuels problиmes rйsultant d'une mauvaise traduction ne sont pas imputables а Nokia. | Qt 4.0 | |
| Copyright © 2012 Developpez LLC. Tous droits rйservйs Developpez LLC. Aucune reproduction, mкme partielle, ne peut кtre faite de ce site et de l'ensemble de son contenu : textes, documents et images sans l'autorisation expresse de Developpez LLC. Sinon, vous encourez selon la loi jusqu'а 3 ans de prison et jusqu'а 300 000 E de dommages et intйrкts. Cette page est dйposйe а la SACD. | ||
| Vous avez dйnichй une erreur ? Un bug ? Une redirection cassйe ? Ou tout autre problиme, quel qu'il soit ? Ou bien vous dйsirez participer а ce projet de traduction ? N'hйsitez pas а nous contacter ou par MP ! | ||
Copyright © 2000-2012 - www.developpez.com