With Qt's integrated build tools, qmake and uic, the code for user interface components created with Qt Designer is automatically generated when the rest of your application is built. Forms can be included and used directly from your application, or you can use them to extend subclasses of standard widgets. These forms can be processed at compile time or at run time, depending on the approach used.
Compile Time Form Processing
A compile time processed form can be used in your application with any of the following approaches:
In the direct approach, you simply construct a widget to use as a placeholder for the component, and set up the user interface inside it.
In the single inheritance approach, you subclass the form's base class (QWidget or QDialog, for example), and include a private instance of the form's user interface object.
In the multiple inheritance approach, you subclass from both the form's base class and the form's user interface object. This allows the widgets defined in the form to be used directly from within the scope of the subclass.
The Direct Approach
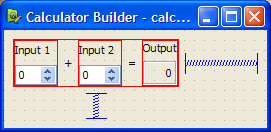
To demonstrate how user interface components can be used straight from Qt Designer, we create a simple Calculator Form application, based on the original Calculator Form example.
The application consists of one source file, main.cpp, and a .ui file.
The calculatorform.ui file designed with Qt Designer is shown below:
We will use qmake to build the executable, so we need to write a .pro file:
 TEMPLATE    = app
 FORMS       = calculatorform.ui
 SOURCES     = main.cpp
The special feature of this file is the FORMS declaration that tells qmake which files it needs to process with uic. In this case, the calculatorform.ui file is used to create a ui_calculatorform.h file that can be used by any files listed in the SOURCES declaration. To ensure that qmake generates the ui_calculatorform.h file, we need to include it in a file listed in SOURCES. Since we only have main.cpp, we include it there:
#include "ui_calculatorform.h"
This additional check ensures that we do not generate code for .ui files that are not used.
The main function creates the calculator widget by constructing a standard QWidget that we use to host the user interface described by the calculatorform.ui file.
In this case, the Ui::CalculatorForm is an interface description object from the ui_calculatorform.h file that sets up all the dialog's widgets and the connections between its signals and slots.
This approach provides a quick and easy way to use simple, self-contained components in your applications, but many components created with Qt Designer will need to be integrated more closely with the rest of the application code. For instance, the CalculatorForm code provided above will compile and run, but the QSpinBox objects will not interact with the QLabel as we require a custom slot to carry out the add operation and display the result in the QLabel. To achieve this, we need to subclass a standard Qt widget.
The Single Inheritance Approach
In this approach, we subclass a Qt widget and set up the user interface from within the constructor. Components used in this way expose the widgets and layouts used in the form to the Qt widget subclass, and provide a standard system for making signal and slot connections between the user interface and other objects in your application.
The important feature of the class is the private ui object which provides the code for setting up and managing the user interface.
The constructor for the subclass constructs and configures all the widgets and layouts for the dialog just by calling the ui object's setupUi() function. Once this has been done, it is possible to modify the user interface as needed.
We can connect signals from the user interface widgets to slots in the widget in the usual way, taking care to prefix the ui object to each widget used.
The main advantages of this approach are its simple use of inheritance to provide a QWidget-based interface, and its encapsulation of the user interface widget variables within the ui data member. We can use this method to define a number of user interfaces within the same widget, each of which is contained within its own namespace, and overlay (or "compose") them. This approach can be used to create individual tabs from existing forms, for example.
The Multiple Inheritance Approach
Forms created with Qt Designer can be subclassed along with a standard QWidget-based class. This approach makes all the user interface components defined in the form directly accessible within the scope of the subclass, and enables signal and slot connections to be made in the usual way with the connect() function.
We need to include the header file that uic generates from the calculatorform.ui file:
#include "ui_calculatorform.h"
The class is defined in a similar way to the one used in the private interface approach, except that this time we inherit from both QWidget and Ui::CalculatorForm:
We inherit Ui::CalculatorForm privately to ensure that the user interface objects are private in our subclass. We can also inherit it with the public or protected keywords in the same way that we could have made ui public or protected in the previous case.
The constructor for the subclass performs many of the same tasks as the constructor used in the private interface example:
In this case, the widgets used in the user interface can be accessed in the same way as a widget created in code by hand. We no longer require the ui prefix to access them.
Subclassing using multiple inheritance gives us more direct access to the contents of the form, is slightly cleaner than the single inheritance approach, but does not conveniently support composition of multiple user interfaces.
Run Time Form Processing
Alternatively, forms can be processed at run time, producing dynamically-generated user interfaces. This can be done using the QtUiTools module, which provides the QUiLoader class to handle forms created with Qt Designer.
The UiTools Approach
A resource file containing a .ui file is required to process forms at run time. Also, the application needs to be configured to use the QtUiTools module. This is done by including the following declaration in a qmake project file, ensuring that the application is compiled and linked appropriately.
CONFIG += uitools
The QUiLoader class provides a form loader object to construct the user interface. This user interface can be retrieved from any QIODevice (a QFile object for example) to obtain a form stored in a project's resources. The QUiLoader::load() function constructs the form widget using the user interface description contained in the file.
The QtUiTools module classes can be included using the following directive:
In a class that uses QtUiTools to build its user interface at run time, we can locate objects in the form using qFindChild(). For example, in the following code, we locate some components based on their object names and widget types:
Processing forms at run-time gives the user the freedom to change a program's user interface, just by changing the .ui file. This is useful when customizing programs to suit various user needs.
Automatic Connections
The signals and slots connections defined for compile time or run time forms can either be set up manually or automatically, using QMetaObject's ability to make connections between signals and suitably-named slots.
Generally, in a QDialog, if we want to process the information entered by the user before accepting it, we need to connect the clicked() signal from the OK button to a custom slot in our dialog. We will first show an example of the dialog in which the slot is connected by hand then compare it with a dialog that uses automatic connection.
A Dialog Without Auto-Connect
We define the dialog in the same way as before, but now include a slot in addition to the constructor:
 class ImageDialog : public QDialog, private Ui::ImageDialog
 {
     Q_OBJECT

 public:
     ImageDialog(QWidget *parent = 0);

 private slots:
     void checkValues();
 };
The checkValues() slot will be used to validate the values provided by the user.
In the dialog's constructor we set up the widgets as before, and connect the Cancel button's clicked() signal to the dialog's reject() slot. We also disable the autoDefault property in both buttons to ensure that the dialog does not interfere with the way that the line edit handles return key events:
We connect the OK button's clicked() signal to the dialog's checkValues() slot which we implement as follows:
 void ImageDialog::checkValues()
 {
     if (nameLineEdit->text().isEmpty())
         (void) QMessageBox::information(this, tr("No Image Name"),
             tr("Please supply a name for the image."), QMessageBox::Cancel);
     else
         accept();
 }
This custom slot does the minimum necessary to ensure that the data entered by the user is valid - it only accepts the input if a name was given for the image.
Widgets and Dialogs with Auto-Connect
Although it is easy to implement a custom slot in the dialog and connect it in the constructor, we could instead use QMetaObject's auto-connection facilities to connect the OK button's clicked() signal to a slot in our subclass. uic automatically generates code in the dialog's setupUi() function to do this, so we only need to declare and implement a slot with a name that follows a standard convention:
Using this convention, we can define and implement a slot that responds to mouse clicks on the OK button:
 class ImageDialog : public QDialog, private Ui::ImageDialog
 {
     Q_OBJECT

 public:
     ImageDialog(QWidget *parent = 0);

 private slots:
     void on_okButton_clicked();
 };
Another example of automatic signal and slot connection would be the Text Finder with its on_findButton_clicked() slot.
We use QMetaObject's system to enable signal and slot connections:
QMetaObject::connectSlotsByName(this);
This enables us to implement the slot, as shown below:
 void TextFinder::on_findButton_clicked()
 {
     QString searchString = ui_lineEdit->text();
     QTextDocument *document = ui_textEdit->document();

     bool found = false;

     if (isFirstTime == false)
         document->undo();

     if (searchString == "") {
         QMessageBox::information(this, tr("Empty Search Field"),
                 "The search field is empty. Please enter a word and click Find.");
     } else {

         QTextCursor highlightCursor(document);
         QTextCursor cursor(document);

         cursor.beginEditBlock();
     ...
         cursor.endEditBlock();
         isFirstTime = false;

         if (found == false) {
             QMessageBox::information(this, tr("Word Not Found"),
                 "Sorry, the word cannot be found.");
         }
     }
 }
Automatic connection of signals and slots provides both a standard naming convention and an explicit interface for widget designers to work to. By providing source code that implements a given interface, user interface designers can check that their designs actually work without having to write code themselves.
Le blog Digia est l'endroit privilégié pour la communication sur l'édition commerciale de Qt, où des réponses publiques sont apportées aux questions les plus posées au support. Lire l'article.
Vous souhaitez rejoindre la rédaction ou proposer un tutoriel, une traduction, une question... ? Postez dans le forum Contribuez ou contactez-nous par MP ou par email (voir en bas de page).
Qt dans le magazine
Cette page est une traduction d'une page de la documentation de Qt, écrite par Nokia Corporation and/or its subsidiary(-ies). Les éventuels problèmes résultant d'une mauvaise traduction ne sont pas imputables à Nokia.
Vous avez déniché une erreur ? Un bug ? Une redirection cassée ? Ou tout autre problème, quel qu'il soit ? Ou bien vous désirez participer à ce projet de traduction ? N'hésitez pas à nous contacter
ou par MP !