Using Layouts in Qt Designer |
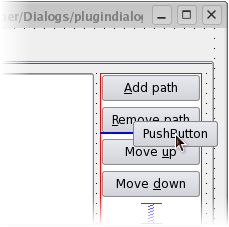 | Inserting Objects into a Layout Objects can be inserted into an existing layout by dragging them from their current positions and dropping them at the required location. A blue cursor is displayed in the layout as an object is dragged over it to indicate where the object will be added. |
Setting A Top Level Layout
The form's top level layout can be set by clearing the slection (click the left mouse button on the form itself) and applying a layout. A top level layout is necessary to ensure that your widgets will resize correctly when its window is resized. To check if you have set a top level layout, preview your widget and attempt to resize the window by dragging the size grip.
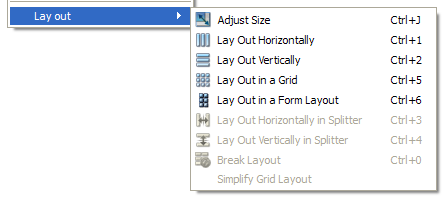
 | Applying a Layout To apply a layout, you can select your choice of layout from the toolbar shown on the left, or from the context menu shown below. |
Horizontal and Vertical Layouts
The simplest way to arrange objects on a form is to place them in a horizontal or vertical layout. Horizontal layouts ensure that the widgets within are aligned horizontally; vertical layouts ensure that they are aligned vertically.
Horizontal and vertical layouts can be combined and nested to any depth. However, if you need more control over the placement of objects, consider using the grid layout.
The Grid Layout
Complex form layouts can be created by placing objects in a grid layout. This kind of layout gives the form designer much more freedom to arrange widgets on the form, but can result in a much less flexible layout. However, for some kinds of form layout, a grid arrangement is much more suitable than a nested arrangement of horizontal and vertical layouts.
Splitter Layouts
Another common way to manage the layout of objects on a form is to place them in a splitter. These splitters arrange the objects horizontally or vertically in the same way as normal layouts, but also allow the user to adjust the amount of space allocated to each object.
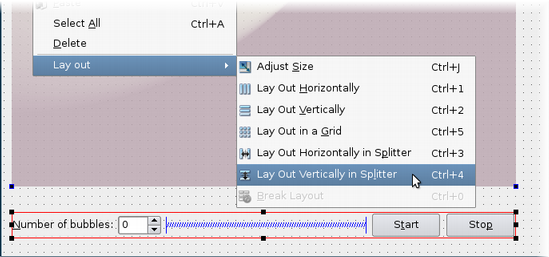
Although QSplitter is a container widget, Qt Designer treats splitter objects as layouts that are applied to existing widgets. To place a group of widgets into a splitter, select them as described here then apply the splitter layout by using the appropriate toolbar button, keyboard shortcut, or Lay out context menu entry.
The Form Layout
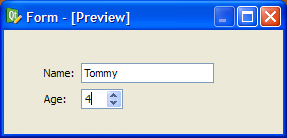
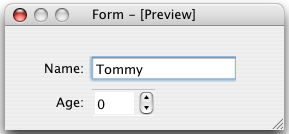
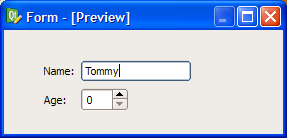
Since Qt 4.4, another layout class has been included -- QFormLayout. This class manages widgets in a two-column form; the left column holds labels and the right column holds field widgets such as line edits, spin boxes, etc. The QFormLayout class adheres to various platform look and feel guidelines and supports wrapping for long rows.
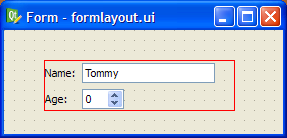
The UI file above results in the previews shown below.
| Windows XP | Mac OS X | Cleanlooks |
|---|---|---|
 |  |  |
Shortcut Keys
In addition to the standard toolbar and context menu entries, there is also a set of keyboard shortcuts to apply layouts on widgets.
| Layout | Shortcut | Description |
|---|---|---|
| Horizontal | Ctrl+1 | Places the selected objects in a horizontal layout. |
| Vertical | Ctrl+2 | Places the selected objects in a vertical layout. |
| Grid | Ctrl+5 | Places the selected objects in a grid layout. |
| Form | Ctrl+6 | Places the selected objects in a form layout. |
| Horizontal splitter | Ctrl+3 | Creates a horizontal splitter and places the selected objects inside it. |
| Vertical splitter | Ctrl+4 | Creates a vertical splitter and places the selected objects inside it. |
| Adjust size | Ctrl+J | Adjusts the size of the layout to ensure that each child object has sufficient space to display its contents. See QWidget::adjustSize() for more information. |
Note: Ctrl+0 is used to break a layout.
[Previous: Qt Designer's Widget Editing Mode] [] [Next: Qt Designer's Signals and Slots Editing Mode]
Best Of
Actualités les plus lues
- « Quelque chose ne va vraiment pas avec les développeurs "modernes" », un développeur à "l'ancienne" critique la multiplication des bibliothèques 44
- Quelles nouveautés de C++11 Visual C++ doit-il rapidement intégrer ? Donnez-nous votre avis 10
- Créer des applications avec un style Metro avec Qt, exemples en QML et C++, un article du blog Digia traduit par Thibaut Cuvelier 0
- Partage de données explicite et implicite avec Qt, un article de Christophe Dumez traduit par Thibaut Cuvelier 0
- « Quelque chose ne va vraiment pas avec les développeurs "modernes" », un développeur à "l'ancienne" critique la multiplication des bibliothèques 44
- Microsoft ouvre aux autres compilateurs C++ AMP, la spécification pour la conception d'applications parallèles C++ utilisant le GPU 22
- Les développeurs ignorent-ils trop les failles découvertes dans leur code ? Prenez-vous en compte les remarques des autres ? 17
- RIM : « 13 % des développeurs ont gagné plus de 100 000 $ sur l'AppWord », Qt et open-source au menu du BlackBerry DevCon Europe 0
- BlackBerry 10 : premières images du prochain OS de RIM qui devrait intégrer des widgets et des tuiles inspirées de Windows Phone 0
- Quelles nouveautés de C++11 Visual C++ doit-il rapidement intégrer ? Donnez-nous votre avis 10
- Adieu qmake, bienvenue qbs : Qt Building Suite, un outil déclaratif et extensible pour la compilation de projets Qt 17

- Linus Torvalds : le "C++ est un langage horrible", en justifiant le choix du C pour le système de gestion de version Git 100
- Comment prendre en compte l'utilisateur dans vos applications ? Pour un développeur, « 90 % des utilisateurs sont des idiots » 229
- Quel est LE livre que tout développeur doit lire absolument ? Celui qui vous a le plus marqué et inspiré 96
- Apple cède et s'engage à payer des droits à Nokia, le conflit des brevets entre les deux firmes s'achève 158
- Nokia porte à nouveau plainte contre Apple pour violation de sept nouveaux brevets 158
- Quel est le code dont vous êtes le plus fier ? Pourquoi l'avez-vous écrit ? Et pourquoi vous a-t-il donné autant de satisfaction ? 83
- Le Draft final de la norme C++ 0X validé 181

Le Qt Quarterly au hasard

XQuery et la météo
Communauté
Ressources
- 91 cours et tutoriels Qt
- F.A.Q. Qt : 200 questions et réponses
- 48 Qt Quarterly, 35 Qt Labs et 22 Qt DevNet en français
- 43 outils Qt
- 99 sources Qt
- 26 binaires Qt
- 6 livres Qt et 9 critiques
- La documentation de Qt 4.7 en français : 157 classes, 70 concepts et 24 modules
- 3 certifications Qt
Liens utiles
Contact
- Vous souhaitez rejoindre la rédaction ou proposer un tutoriel, une traduction, une question... ? Postez dans le forum Contribuez ou contactez-nous par MP ou par email (voir en bas de page).
Qt dans le magazine
| Cette page est une traduction d'une page de la documentation de Qt, écrite par Nokia Corporation and/or its subsidiary(-ies). Les éventuels problèmes résultant d'une mauvaise traduction ne sont pas imputables à Nokia. | Qt 4.6 | |
| Copyright © 2012 Developpez LLC. Tous droits réservés Developpez LLC. Aucune reproduction, même partielle, ne peut être faite de ce site et de l'ensemble de son contenu : textes, documents et images sans l'autorisation expresse de Developpez LLC. Sinon, vous encourez selon la loi jusqu'à 3 ans de prison et jusqu'à 300 000 E de dommages et intérêts. Cette page est déposée à la SACD. | ||
| Vous avez déniché une erreur ? Un bug ? Une redirection cassée ? Ou tout autre problème, quel qu'il soit ? Ou bien vous désirez participer à ce projet de traduction ? N'hésitez pas à nous contacter ou par MP ! | ||
Copyright © 2000-2012 - www.developpez.com


