


A Quick Start to Qt Designer |
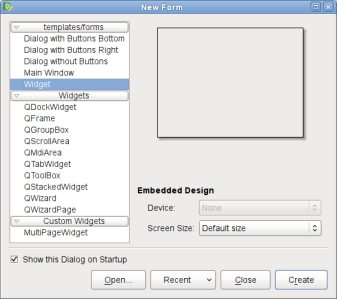 | Choosing a Form You start by choosing Widget from the New Form dialog. |
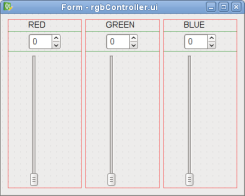
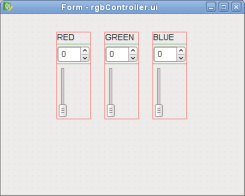 | Placing Widgets on a Form Drag three labels, three spin boxes and three vertical sliders on to your form. To change the label's default text, simply double-click on it. You can arrange them according to how you would like them to be laid out. |
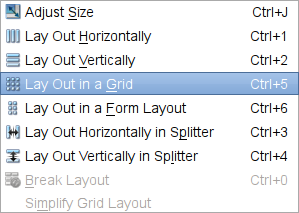
To ensure that they are laid out exactly like this in your program, you need to place these widgets into a layout. We will do this in groups of three. Select the "RED" label. Then, hold down Ctrl while you select its corresponding spin box and slider. In the Form menu, select Lay Out in a Grid.
 |  |
Repeat the step for the other two labels along with their corresponding spin boxes and sliders as well.
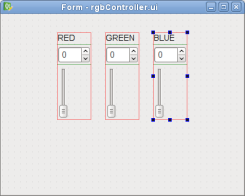
The next step is to combine all three layouts into one main layout. The main layout is the top level widget's (in this case, the QWidget) layout. It is important that your top level widget has a layout; otherwise, the widgets on your window will not resize when your window is resized. To set the layout, Right click anywhere on your form, outside of the three separate layouts, and select Lay Out Horizontally. Alternatively, you could also select Lay Out in a Grid -- you will still see the same arrangement (shown below).
Note: Main layouts cannot be seen on the form. To check if you have a main layout installed, try resizing your form; your widgets should resize accordingly. Alternatively, you can take a look at Qt Designer's Object Inspector. If your top level widget does not have a layout, you will see the broken layout icon next to it,  .
.
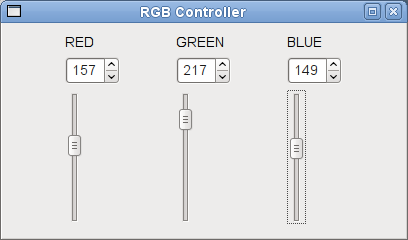
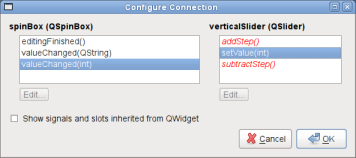
When you click on the slider and drag it to a certain value, you want the spin box to display the slider's position. To accomplish this behavior, you need to connect the slider's valueChanged() signal to the spin box's setValue() slot. You also need to make the reverse connections, e.g., connect the spin box's valueChanged() signal to the slider's setValue() slot.
To do this, you have to switch to Edit Signals/Slots mode, either by pressing F4 or selecting Edit Signals/Slots from the Edit menu.
 | Connecting Signals to Slots Click on the slider and drag the cursor towards the spin box. The Configure Connection dialog, shown below, will pop up. Select the correct signal and slot and click OK. |
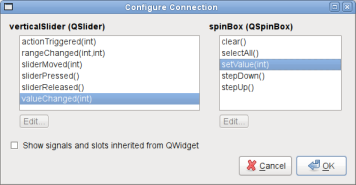
Repeat the step (in reverse order), clicking on the spin box and dragging the cursor towards the slider, to connect the spin box's valueChanged() signal to the slider's setValue() slot.
You can use the screenshot below as a guide to selecting the correct signal and slot.
Now that you have successfully connected the objects for the "RED" component of the RGB Controller, do the same for the "GREEN" and "BLUE" components as well.
Since RGB values range between 0 and 255, we need to limit the spin box and slider to that particular range.
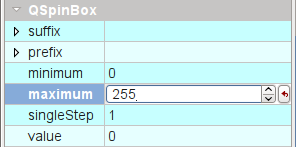 | Setting Widget Properties Click on the first spin box. Within the Property Editor, you will see QSpinBox's properties. Enter "255" for the maximum property. Then, click on the first vertical slider, you will see QAbstractSlider's properties. Enter "255" for the maximum property as well. Repeat this process for the remaining spin boxes and sliders. |
Now, we preview your form to see how it would look in your application - press Ctrl + R or select Preview from the Form menu. Try dragging the slider - the spin box will mirror its value too (and vice versa). Also, you can resize it to see how the layouts that are used to manage the child widgets, respond to different window sizes.
[Contents]
Best Of
Actualités les plus lues
- « Quelque chose ne va vraiment pas avec les développeurs "modernes" », un développeur à "l'ancienne" critique la multiplication des bibliothèques 70
- 2017 : un quinquennat pour une nouvelle version du C++ ? Possible, selon Herb Sutter 6
- Créer des applications avec un style Metro avec Qt, exemples en QML et C++, un article du blog Digia traduit par Thibaut Cuvelier 0
- Orientation de l'écran en QML, un article de Christophe Dumez traduit par Thibaut Cuvelier 0
- « Quelque chose ne va vraiment pas avec les développeurs "modernes" », un développeur à "l'ancienne" critique la multiplication des bibliothèques 70
- Apercevoir la troisième dimension ou l'utilisation multithreadée d'OpenGL dans Qt, un article des Qt Quarterly traduit par Guillaume Belz 0
- Les développeurs ignorent-ils trop les failles découvertes dans leur code ? Prenez-vous en compte les remarques des autres ? 17
- BlackBerry 10 : premières images du prochain OS de RIM qui devrait intégrer des widgets et des tuiles inspirées de Windows Phone 0
- Quelles nouveautés de C++11 Visual C++ doit-il rapidement intégrer ? Donnez-nous votre avis 10
- Adieu qmake, bienvenue qbs : Qt Building Suite, un outil déclaratif et extensible pour la compilation de projets Qt 17
- La rubrique PyQt/PySide a besoin de vous ! 0

- Linus Torvalds : le "C++ est un langage horrible", en justifiant le choix du C pour le système de gestion de version Git 100
- Comment prendre en compte l'utilisateur dans vos applications ? Pour un développeur, « 90 % des utilisateurs sont des idiots » 229
- Quel est LE livre que tout développeur doit lire absolument ? Celui qui vous a le plus marqué et inspiré 96
- Apple cède et s'engage à payer des droits à Nokia, le conflit des brevets entre les deux firmes s'achève 158
- Nokia porte à nouveau plainte contre Apple pour violation de sept nouveaux brevets 158
- Quel est le code dont vous êtes le plus fier ? Pourquoi l'avez-vous écrit ? Et pourquoi vous a-t-il donné autant de satisfaction ? 83
- Le Draft final de la norme C++ 0X validé 181

Communauté
Ressources
- cours et tutoriels Qt
- F.A.Q. Qt : questions et réponses
- Qt Quarterly, Qt Labs et Qt DevNet en français
- outils Qt
- sources Qt
- binaires Qt
- livres Qt et critiques
- La documentation de Qt en français : classes, concepts et modules
- 3 certifications Qt
Liens utiles
Contact
- Vous souhaitez rejoindre la rédaction ou proposer un tutoriel, une traduction, une question... ? Postez dans le forum Contribuez ou contactez-nous par MP ou par email (voir en bas de page).
Qt dans le magazine
| Cette page est une traduction d'une page de la documentation de Qt, écrite par Nokia Corporation and/or its subsidiary(-ies). Les éventuels problèmes résultant d'une mauvaise traduction ne sont pas imputables à Nokia. | Qt 4.6 | |
| Copyright © 2012 Developpez LLC. Tous droits réservés Developpez LLC. Aucune reproduction, même partielle, ne peut être faite de ce site et de l'ensemble de son contenu : textes, documents et images sans l'autorisation expresse de Developpez LLC. Sinon, vous encourez selon la loi jusqu'à 3 ans de prison et jusqu'à 300 000 E de dommages et intérêts. Cette page est déposée à la SACD. | ||
| Vous avez déniché une erreur ? Un bug ? Une redirection cassée ? Ou tout autre problème, quel qu'il soit ? Ou bien vous désirez participer à ce projet de traduction ? N'hésitez pas à nous contacter ou par MP ! | ||
Copyright © 2000-2012 - www.developpez.com