The class provides a constructor, a slot to keep the buttons up to date, and a private function to set up the model:
Window Class Implementation
The first act performed by the Window class constructor is to set up the model used to hold the example data. Since this is a key part of the example, we will look at this first.
The model is initialized in the window's setupModel() function. Here, we create a SQLite database containing a "person" table with primary key, name, address and type fields.
 void Window::setupModel()
 {
     QSqlDatabase db = QSqlDatabase::addDatabase("QSQLITE");
     db.setDatabaseName(":memory:");
     if (!db.open()) {
         QMessageBox::critical(0, tr("Cannot open database"),
             tr("Unable to establish a database connection.\n"
                "This example needs SQLite support. Please read "
                "the Qt SQL driver documentation for information how "
                "to build it."), QMessageBox::Cancel);
         return;
     }

     QSqlQuery query;
     query.exec("create table person (id int primary key, "
                "name varchar(20), address varchar(200), typeid int)");
     query.exec("insert into person values(1, 'Alice', "
                "'<qt>123 Main Street<br/>Market Town</qt>', 101)");
     query.exec("insert into person values(2, 'Bob', "
                "'<qt>PO Box 32<br/>Mail Handling Service"
                "<br/>Service City</qt>', 102)");
     query.exec("insert into person values(3, 'Carol', "
                "'<qt>The Lighthouse<br/>Remote Island</qt>', 103)");
     query.exec("insert into person values(4, 'Donald', "
                "'<qt>47338 Park Avenue<br/>Big City</qt>', 101)");
     query.exec("insert into person values(5, 'Emma', "
                "'<qt>Research Station<br/>Base Camp<br/>"
                "Big Mountain</qt>', 103)");
On each row of the table, we insert default values for these fields, including values for the address types that correspond to the address types are stored in a separate table.
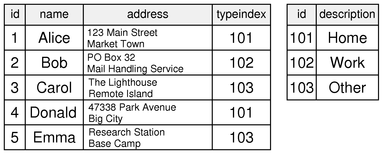
We create an "addresstype" table containing the identifiers used in the "person" table and the corresponding strings:
     query.exec("create table addresstype (id int, description varchar(20))");
     query.exec("insert into addresstype values(101, 'Home')");
     query.exec("insert into addresstype values(102, 'Work')");
     query.exec("insert into addresstype values(103, 'Other')");

     model = new QSqlRelationalTableModel(this);
     model->setTable("person");
     model->setEditStrategy(QSqlTableModel::OnManualSubmit);

     typeIndex = model->fieldIndex("typeid");

     model->setRelation(typeIndex,
            QSqlRelation("addresstype", "id", "description"));
     model->select();
 }
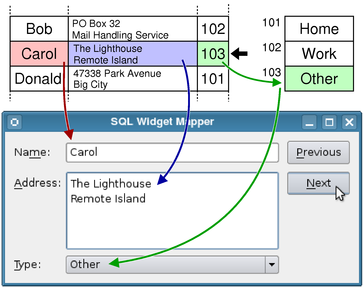
The "typeid" field in the "person" table is related to the contents of the "addresstype" table via a relation in a QSqlRelationalTableModel. This kind of model performs all the necessary work to store the data in a database and also allows any relations to be used as models in their own right.
In this case, we have defined a relation for the "typeid" field in the "person" table that relates it to the "id" field in the "addresstype" table and which causes the contents of the "description" field to be used wherever the "typeid" is presented to the user. (See the QSqlRelationalTableModel::setRelation() documentation for details.)
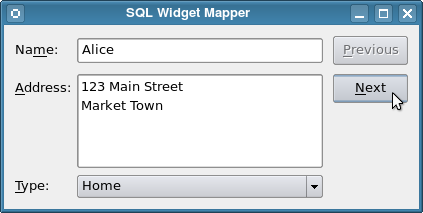
The constructor of the Window class can be explained in three parts. In the first part, we set up the model used to hold the data, then we set up the widgets used for the user interface:
 Window::Window(QWidget *parent)
     : QWidget(parent)
 {
     setupModel();

     nameLabel = new QLabel(tr("Na&me:"));
     nameEdit = new QLineEdit();
     addressLabel = new QLabel(tr("&Address:"));
     addressEdit = new QTextEdit();
     typeLabel = new QLabel(tr("&Type:"));
     typeComboBox = new QComboBox();
     nextButton = new QPushButton(tr("&Next"));
     previousButton = new QPushButton(tr("&Previous"));

     nameLabel->setBuddy(nameEdit);
     addressLabel->setBuddy(addressEdit);
     typeLabel->setBuddy(typeComboBox);
We obtain a model for the combo box from the main model, based on the relation we set up for the "typeid" field. The call to the combo box's setModelColumn() selects the field in the field in the model to display.
Note that this approach is similar to the one used in the Combo Widget Mapper Example in that we set up a model for the combo box. However, in this case, we obtain a model based on a relation in the QSqlRelationalTableModel rather than create a separate one.
Next, we set up the widget mapper, relating each input widget to a field in the model:
     QSqlTableModel *relModel = model->relationModel(typeIndex);
     typeComboBox->setModel(relModel);
     typeComboBox->setModelColumn(relModel->fieldIndex("description"));

     mapper = new QDataWidgetMapper(this);
     mapper->setModel(model);
     mapper->setItemDelegate(new QSqlRelationalDelegate(this));
     mapper->addMapping(nameEdit, model->fieldIndex("name"));
     mapper->addMapping(addressEdit, model->fieldIndex("address"));
     mapper->addMapping(typeComboBox, typeIndex);
For the combo box, we already know the index of the field in the model from the setupModel() function. We use a QSqlRelationalDelegate as a proxy between the mapper and the input widgets to match up the "typeid" values in the model with those in the combo box's model and populate the combo box with descriptions rather than integer values.
As a result, the user is able to select an item from the combo box, and the associated value is written back to the model.
The rest of the constructor is very similar to that of the Simple Widget Mapper Example:
     connect(previousButton, SIGNAL(clicked()),
             mapper, SLOT(toPrevious()));
     connect(nextButton, SIGNAL(clicked()),
             mapper, SLOT(toNext()));
     connect(mapper, SIGNAL(currentIndexChanged(int)),
             this, SLOT(updateButtons(int)));

     QGridLayout *layout = new QGridLayout();
     layout->addWidget(nameLabel, 0, 0, 1, 1);
     layout->addWidget(nameEdit, 0, 1, 1, 1);
     layout->addWidget(previousButton, 0, 2, 1, 1);
     layout->addWidget(addressLabel, 1, 0, 1, 1);
     layout->addWidget(addressEdit, 1, 1, 2, 1);
     layout->addWidget(nextButton, 1, 2, 1, 1);
     layout->addWidget(typeLabel, 3, 0, 1, 1);
     layout->addWidget(typeComboBox, 3, 1, 1, 1);
     setLayout(layout);

     setWindowTitle(tr("SQL Widget Mapper"));
     mapper->toFirst();
 }
We show the implementation of the updateButtons() slot for completeness:
 void Window::updateButtons(int row)
 {
     previousButton->setEnabled(row > 0);
     nextButton->setEnabled(row < model->rowCount() - 1);
 }
Summary and Further Reading
The use of a separate model for the combo box and a special delegate for the widget mapper allows us to present a menu of choices to the user. Although the choices are stored in the same database as the user's data, they are held in a separate table. Using this approach, we can reconstructed complete records at a later time while using database features appropriately.
If SQL models are not being used, it is still possible to use more than one model to present choices to the user. This is covered by the Combo Widget Mapper Example.