Viadeo Twitter Google Bookmarks ! Facebook Digg del.icio.us MySpace Yahoo MyWeb Blinklist Netvouz Reddit Simpy StumbleUpon Bookmarks Windows Live Favorites 
Logo Documentation Qt ·  Page d'accueil  ·  Toutes les classes  ·  Toutes les fonctions  ·  Vues d'ensemble  · 

Address Book 1 - Designing the User Interface

Files:

The first part of this tutorial covers the design of the basic graphical user interface (GUI) we use for the Address Book application.

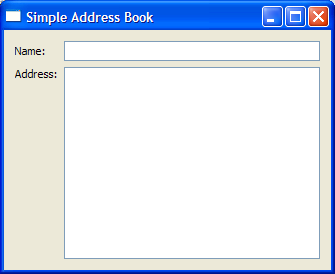
The first step to creating a GUI program is to design the user interface. In this chapter, our goal is to set up the labels and input fields needed to implement a basic address book application. The figure below is a screenshot of our expected output.

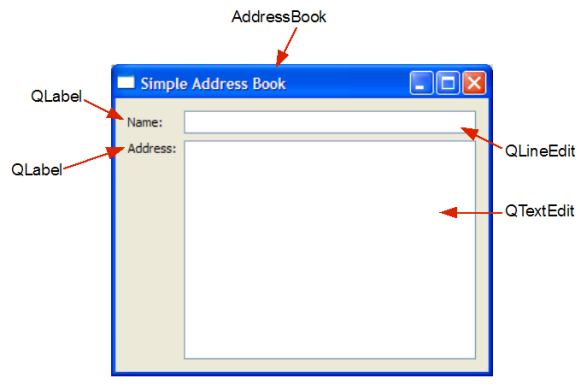
We require two QLabel objects, nameLabel and addressLabel, as well as two input fields, a QLineEdit object, nameLine, and a QTextEdit object, addressText, to enable the user to enter a contact's name and address. The widgets used and their positions are shown in the figure below.

There are three files used to implement this address book:

  • addressbook.h - the definition file for the AddressBook class,
  • addressbook.cpp - the implementation file for the AddressBook class, and
  • main.cpp - the file containing a main() function, with an instance of AddressBook.

Qt Programming - Subclassing

When writing Qt programs, we usually subclass Qt objects to add functionality. This is one of the essential concepts behind creating custom widgets or collections of standard widgets. Subclassing to extend or change the behavior of a widget has the following advantages:

  • We can write implementations of virtual or pure virtual functions to obtain exactly what we need, falling back on the base class's implementation when necessary.
  • It allows us to encapsulate parts of the user interface within a class, so that the other parts of the application don't need to know about the individual widgets in the user interface.
  • The subclass can be used to create multiple custom widgets in the same application or library, and the code for the subclass can be reused in other projects.

Since Qt does not provide a specific address book widget, we subclass a standard Qt widget class and add features to it. The AddressBook class we create in this tutorial can be reused in situations where a basic address book widget is needed.

Defining the AddressBook Class

The addressbook.h file is used to define the AddressBook class.

We start by defining AddressBook as a QWidget subclass and declaring a constructor. We also use the Q_OBJECT macro to indicate that the class uses internationalization and Qt's signals and slots features, even if we do not use all of these features at this stage.

 class AddressBook : public QWidget
 {
     Q_OBJECT

 public:
     AddressBook(QWidget *parent = 0);

 private:
     QLineEdit *nameLine;
     QTextEdit *addressText;
 };

The class holds declarations of nameLine and addressText, the private instances of QLineEdit and QTextEdit mentioned earlier. You will see, in the coming chapters, that data stored in nameLine and addressText is needed for many of the address book's functions.

We do not need to include declarations of the QLabel objects we will use because we will not need to reference them once they have been created. The way Qt tracks the ownership of objects is explained in the next section.

The Q_OBJECT macro itself implements some of the more advanced features of Qt. For now, it is useful to think of the Q_OBJECT macro as a shortcut which allows us to use the tr() and connect() functions.

We have now completed the addressbook.h file and we move on to implement the corresponding addressbook.cpp file.

Implementing the AddressBook Class

The constructor of AddressBook accepts a QWidget parameter, parent. By convention, we pass this parameter to the base class's constructor. This concept of ownership, where a parent can have one or more children, is useful for grouping widgets in Qt. For example, if you delete a parent, all of its children will be deleted as well.

 AddressBook::AddressBook(QWidget *parent)
     : QWidget(parent)
 {
     QLabel *nameLabel = new QLabel(tr("Name:"));
     nameLine = new QLineEdit;

     QLabel *addressLabel = new QLabel(tr("Address:"));
     addressText = new QTextEdit;

Within this constructor, we declare and instantiate two local QLabel objects, nameLabel and addressLabel, as well as instantiate nameLine and addressText. The tr() function returns a translated version of the string, if there is one available; otherwise, it returns the string itself. Think of this function as an <insert translation here> marker to mark QString objects for translation. You will notice, in the coming chapters as well as in the Qt Examples, that we include it whenever we use a translatable string.

When programming with Qt, it is useful to know how layouts work. Qt provides three main layout classes: QHBoxLayout, QVBoxLayout and QGridLayout to handle the positioning of widgets.
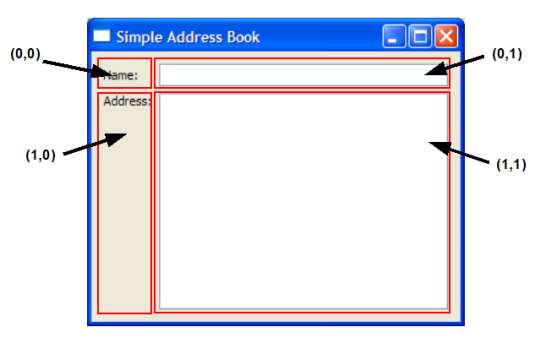
We use a QGridLayout to position our labels and input fields in a structured manner. QGridLayout divides the available space into a grid and places widgets in the cells we specify with row and column numbers. The diagram above shows the layout cells and the position of our widgets, and we specify this arrangement using the following code:

     QGridLayout *mainLayout = new QGridLayout;
     mainLayout->addWidget(nameLabel, 0, 0);
     mainLayout->addWidget(nameLine, 0, 1);
     mainLayout->addWidget(addressLabel, 1, 0, Qt::AlignTop);
     mainLayout->addWidget(addressText, 1, 1);

Notice that addressLabel is positioned using Qt::AlignTop as an additional argument. This is to make sure it is not vertically centered in cell (1,0). For a basic overview on Qt Layouts, refer to the Layout Classes document.

In order to install the layout object onto the widget, we have to invoke the widget's setLayout() function:

     setLayout(mainLayout);
     setWindowTitle(tr("Simple Address Book"));
 }

Lastly, we set the widget's title to "Simple Address Book".

Running the Application

A separate file, main.cpp, is used for the main() function. Within this function, we instantiate a QApplication object, app. QApplication is responsible for various application-wide resources, such as the default font and cursor, and for running an event loop. Hence, there is always one QApplication object in every GUI application using Qt.

 int main(int argc, char *argv[])
 {
     QApplication app(argc, argv);

     AddressBook *addressBook = new AddressBook;
     addressBook->show();

     return app.exec();
 }

We construct a new AddressBook widget on the heap using the new keyword and invoke its show() function to display it. However, the widget will not be shown until the application's event loop is started. We start the event loop by calling the application's exec() function; the result returned by this function is used as the return value from the main() function.

[Contents] [Next: Chapter 2]

Publicité

Best Of

Actualités les plus lues

Semaine
Mois
Année
  1. « Quelque chose ne va vraiment pas avec les développeurs "modernes" », un développeur à "l'ancienne" critique la multiplication des bibliothèques 94
  2. Apercevoir la troisième dimension ou l'utilisation multithreadée d'OpenGL dans Qt, un article des Qt Quarterly traduit par Guillaume Belz 0
  3. Les développeurs ignorent-ils trop les failles découvertes dans leur code ? Prenez-vous en compte les remarques des autres ? 17
  4. Pourquoi les programmeurs sont-ils moins payés que les gestionnaires de programmes ? Manquent-ils de pouvoir de négociation ? 42
  5. Quelles nouveautés de C++11 Visual C++ doit-il rapidement intégrer ? Donnez-nous votre avis 10
  6. 2017 : un quinquennat pour une nouvelle version du C++ ? Possible, selon Herb Sutter 9
  7. Qt Commercial : Digia organise un webinar gratuit le 27 mars sur la conception d'interfaces utilisateur et d'applications avec le framework 0
Page suivante

Le Qt Developer Network au hasard

Logo

Une introduction à Qt Quick

Le Qt Developer Network est un réseau de développeurs Qt anglophone, où ils peuvent partager leur expérience sur le framework. Lire l'article.

Communauté

Ressources

Liens utiles

Contact

  • Vous souhaitez rejoindre la rédaction ou proposer un tutoriel, une traduction, une question... ? Postez dans le forum Contribuez ou contactez-nous par MP ou par email (voir en bas de page).

Qt dans le magazine

Cette page est une traduction d'une page de la documentation de Qt, écrite par Nokia Corporation and/or its subsidiary(-ies). Les éventuels problèmes résultant d'une mauvaise traduction ne sont pas imputables à Nokia. Qt qtextended4.4
Copyright © 2012 Developpez LLC. Tous droits réservés Developpez LLC. Aucune reproduction, même partielle, ne peut être faite de ce site et de l'ensemble de son contenu : textes, documents et images sans l'autorisation expresse de Developpez LLC. Sinon, vous encourez selon la loi jusqu'à 3 ans de prison et jusqu'à 300 000 E de dommages et intérêts. Cette page est déposée à la SACD.
Vous avez déniché une erreur ? Un bug ? Une redirection cassée ? Ou tout autre problème, quel qu'il soit ? Ou bien vous désirez participer à ce projet de traduction ? N'hésitez pas à nous contacter ou par MP !


Partenaires

Hébergement Web