Now that we have the labels and input fields set up, we add push buttons to complete the process of adding a contact. This means that our addressbook.h file now has three QPushButton objects declared and three corresponding public slots.
A slot is a function that responds to a particular signal. We will discuss this concept in further detail when implementing the AddressBook class. However, for an overview of Qt's signals and slots concept, you can refer to the Signals and Slots document.
We need a container to store our address book contacts, so that we can traverse and display them. A QMap object, contacts, is used for this purpose as it holds a key-value pair: the contact's name as the key, and the contact's address as the value.
Implementing the AddressBook Class
Within the constructor of AddressBook, we set the nameLine and addressText to read-only, so that we can only display but not edit existing contact details.
     ...
     nameLine->setReadOnly(true);
     ...
     addressText->setReadOnly(true);
Then, we instantiate our push buttons: addButton, submitButton, and cancelButton.
     addButton = new QPushButton(tr("&Add"));
     addButton->show();
     submitButton = new QPushButton(tr("&Submit"));
     submitButton->hide();
     cancelButton = new QPushButton(tr("&Cancel"));
     cancelButton->hide();
The addButton is displayed by invoking the show() function, while the submitButton and cancelButton are hidden by invoking hide(). These two push buttons will only be displayed when the user clicks Add and this is handled by the addContact() function discussed below.
     connect(addButton, SIGNAL(clicked()), this, SLOT(addContact()));
     connect(submitButton, SIGNAL(clicked()), this, SLOT(submitContact()));
     connect(cancelButton, SIGNAL(clicked()), this, SLOT(cancel()));
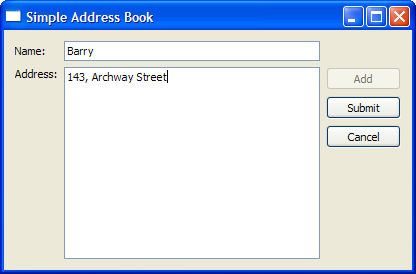
We connect the push buttons' clicked() signal to their respective slots. The figure below illustrates this.

Next, we arrange our push buttons neatly to the right of our address book widget, using a QVBoxLayout to line them up vertically.
QVBoxLayout *buttonLayout1 = new QVBoxLayout;
buttonLayout1->addWidget(addButton, Qt::AlignTop);
buttonLayout1->addWidget(submitButton);
buttonLayout1->addWidget(cancelButton);
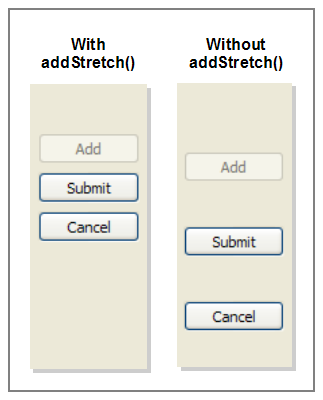
buttonLayout1->addStretch();
The addStretch() function is used to ensure the push buttons are not evenly spaced, but arranged closer to the top of the widget. The figure below shows the difference between using addStretch() and not using it.
We then add buttonLayout1 to mainLayout, using addLayout(). This gives us nested layouts as buttonLayout1 is now a child of mainLayout.
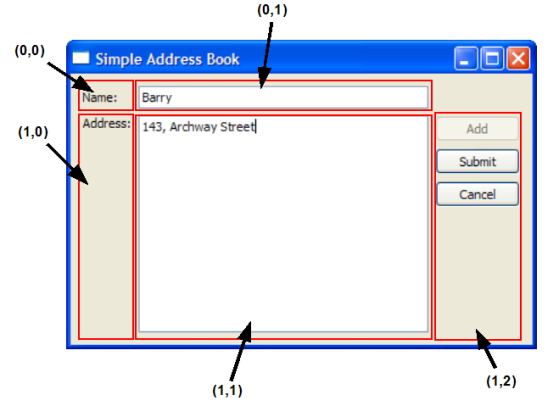
     QGridLayout *mainLayout = new QGridLayout;
     mainLayout->addWidget(nameLabel, 0, 0);
     mainLayout->addWidget(nameLine, 0, 1);
     mainLayout->addWidget(addressLabel, 1, 0, Qt::AlignTop);
     mainLayout->addWidget(addressText, 1, 1);
     mainLayout->addLayout(buttonLayout1, 1, 2);
Our layout coordinates now look like this:
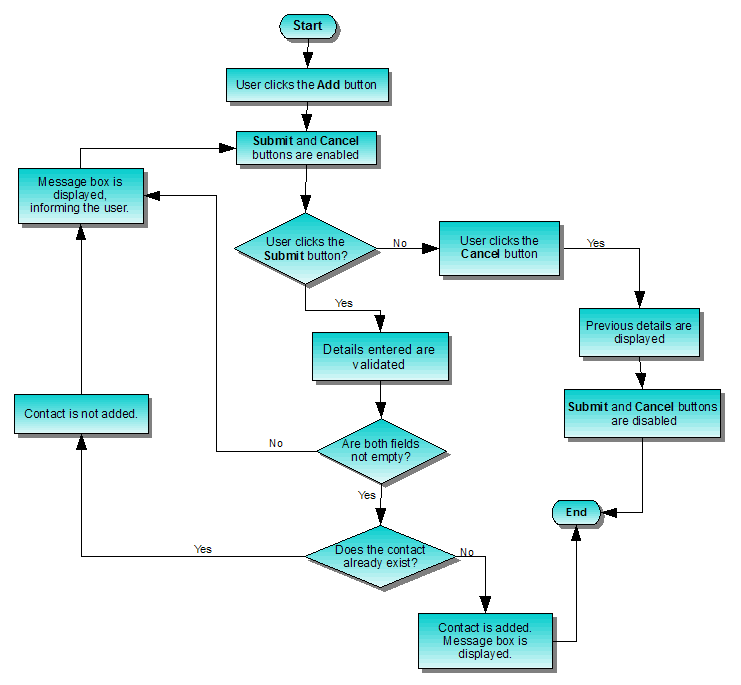
In the addContact() function, we store the last displayed contact details in oldName and oldAddress. Then we clear these input fields and turn off the read-only mode. The focus is set on nameLine and we display submitButton and cancelButton.
 void AddressBook::addContact()
 {
     oldName = nameLine->text();
     oldAddress = addressText->toPlainText();

     nameLine->clear();
     addressText->clear();

     nameLine->setReadOnly(false);
     nameLine->setFocus(Qt::OtherFocusReason);
     addressText->setReadOnly(false);

     addButton->setEnabled(false);
     submitButton->show();
     cancelButton->show();
 }
The submitContact() function can be divided into three parts:
- We extract the contact's details from nameLine and addressText and store them in QString objects. We also validate to make sure that the user did not click Submit with empty input fields; otherwise, a QMessageBox is displayed to remind the user for a name and address.
 void AddressBook::submitContact()
 {
     QString name = nameLine->text();
     QString address = addressText->toPlainText();

     if (name == "" || address == "") {
         QMessageBox::information(this, tr("Empty Field"),
             tr("Please enter a name and address."));
         return;
     }
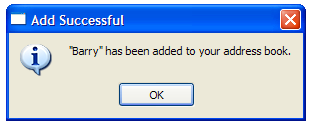
- We then proceed to check if the contact already exists. If it does not exist, we add the contact to contacts and we display a QMessageBox to inform the user that the contact has been added.
     if (!contacts.contains(name)) {
         contacts.insert(name, address);
         QMessageBox::information(this, tr("Add Successful"),
             tr("\"%1\" has been added to your address book.").arg(name));
     } else {
         QMessageBox::information(this, tr("Add Unsuccessful"),
             tr("Sorry, \"%1\" is already in your address book.").arg(name));
         return;
     }
If the contact already exists, again, we display a QMessageBox to inform the user about this, preventing the user from adding duplicate contacts. Our contacts object is based on key-value pairs of name and address, hence, we want to ensure that key is unique.
- Once we have handled both cases mentioned above, we restore the push buttons to their normal state with the following code:
     if (contacts.isEmpty()) {
         nameLine->clear();
         addressText->clear();
     }

     nameLine->setReadOnly(true);
     addressText->setReadOnly(true);
     addButton->setEnabled(true);
     submitButton->hide();
     cancelButton->hide();
 }
The screenshot below shows the QMessageBox object we use to display information messages to the user.
The cancel() function restores the last displayed contact details and enables addButton, as well as hides submitButton and cancelButton.
 void AddressBook::cancel()
 {
     nameLine->setText(oldName);
     nameLine->setReadOnly(true);

     addressText->setText(oldAddress);
     addressText->setReadOnly(true);

     addButton->setEnabled(true);
     submitButton->hide();
     cancelButton->hide();
 }
The general idea behind adding a contact is to give the user the flexibility to click Submit or Cancel at any time. The flowchart below further explains this concept:
[Previous: Address Book 1 - Designing the User Interface]
[Contents]
[Next: Chapter 3]