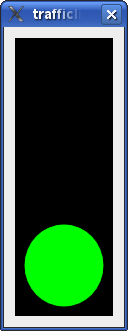
Traffic Light ExampleFiles: The Traffic Light example shows how to use The State Machine Framework to implement the control flow of a traffic light.
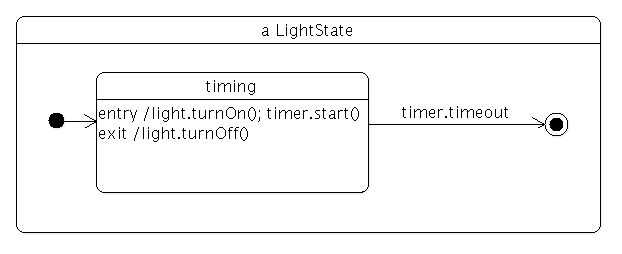
In this example we write a TrafficLightWidget class. The traffic light has three lights: Red, yellow and green. The traffic light transitions from one light to another (red to yellow to green to yellow to red again) at certain intervals. class LightWidget : public QWidget { Q_OBJECT Q_PROPERTY(bool on READ isOn WRITE setOn) public: LightWidget(const QColor &color, QWidget *parent = 0) : QWidget(parent), m_color(color), m_on(false) {} bool isOn() const { return m_on; } void setOn(bool on) { if (on == m_on) return; m_on = on; update(); } public slots: void turnOff() { setOn(false); } void turnOn() { setOn(true); } protected: virtual void paintEvent(QPaintEvent *) { if (!m_on) return; QPainter painter(this); painter.setRenderHint(QPainter::Antialiasing); painter.setBrush(m_color); painter.drawEllipse(0, 0, width(), height()); } private: QColor m_color; bool m_on; }; The LightWidget class represents a single light of the traffic light. It provides an on property and two slots, turnOn() and turnOff(), to turn the light on and off, respectively. The widget paints itself in the color that's passed to the constructor. class TrafficLightWidget : public QWidget { public: TrafficLightWidget(QWidget *parent = 0) : QWidget(parent) { QVBoxLayout *vbox = new QVBoxLayout(this); m_red = new LightWidget(Qt::red); vbox->addWidget(m_red); m_yellow = new LightWidget(Qt::yellow); vbox->addWidget(m_yellow); m_green = new LightWidget(Qt::green); vbox->addWidget(m_green); QPalette pal = palette(); pal.setColor(QPalette::Background, Qt::black); setPalette(pal); setAutoFillBackground(true); } LightWidget *redLight() const { return m_red; } LightWidget *yellowLight() const { return m_yellow; } LightWidget *greenLight() const { return m_green; } private: LightWidget *m_red; LightWidget *m_yellow; LightWidget *m_green; }; The TrafficLightWidget class represents the visual part of the traffic light; it's a widget that contains three lights arranged vertically, and provides accessor functions for these. QState *createLightState(LightWidget *light, int duration, QState *parent = 0) { QState *lightState = new QState(parent); QTimer *timer = new QTimer(lightState); timer->setInterval(duration); timer->setSingleShot(true); QState *timing = new QState(lightState); QObject::connect(timing, SIGNAL(entered()), light, SLOT(turnOn())); QObject::connect(timing, SIGNAL(entered()), timer, SLOT(start())); QObject::connect(timing, SIGNAL(exited()), light, SLOT(turnOff())); QFinalState *done = new QFinalState(lightState); timing->addTransition(timer, SIGNAL(timeout()), done); lightState->setInitialState(timing); return lightState; } The createLightState() function creates a state that turns a light on when the state is entered, and off when the state is exited. The state uses a timer, and as we shall see the timeout is used to transition from one LightState to another. Here is the statechart for the light state:
 class TrafficLight : public QWidget
 {
 public:
     TrafficLight(QWidget *parent = 0)
         : QWidget(parent)
     {
         QVBoxLayout *vbox = new QVBoxLayout(this);
         TrafficLightWidget *widget = new TrafficLightWidget();
         vbox->addWidget(widget);
         vbox->setMargin(0);

         QStateMachine *machine = new QStateMachine(this);
         QState *redGoingYellow = createLightState(widget->redLight(), 3000);
         redGoingYellow->setObjectName("redGoingYellow");
         QState *yellowGoingGreen = createLightState(widget->yellowLight(), 1000);
         yellowGoingGreen->setObjectName("yellowGoingGreen");
         redGoingYellow->addTransition(redGoingYellow, SIGNAL(finished()), yellowGoingGreen);
         QState *greenGoingYellow = createLightState(widget->greenLight(), 3000);
         greenGoingYellow->setObjectName("greenGoingYellow");
         yellowGoingGreen->addTransition(yellowGoingGreen, SIGNAL(finished()), greenGoingYellow);
         QState *yellowGoingRed = createLightState(widget->yellowLight(), 1000);
         yellowGoingRed->setObjectName("yellowGoingRed");
         greenGoingYellow->addTransition(greenGoingYellow, SIGNAL(finished()), yellowGoingRed);
         yellowGoingRed->addTransition(yellowGoingRed, SIGNAL(finished()), redGoingYellow);

         machine->addState(redGoingYellow);
         machine->addState(yellowGoingGreen);
         machine->addState(greenGoingYellow);
         machine->addState(yellowGoingRed);
         machine->setInitialState(redGoingYellow);
         machine->start();
     }
 };
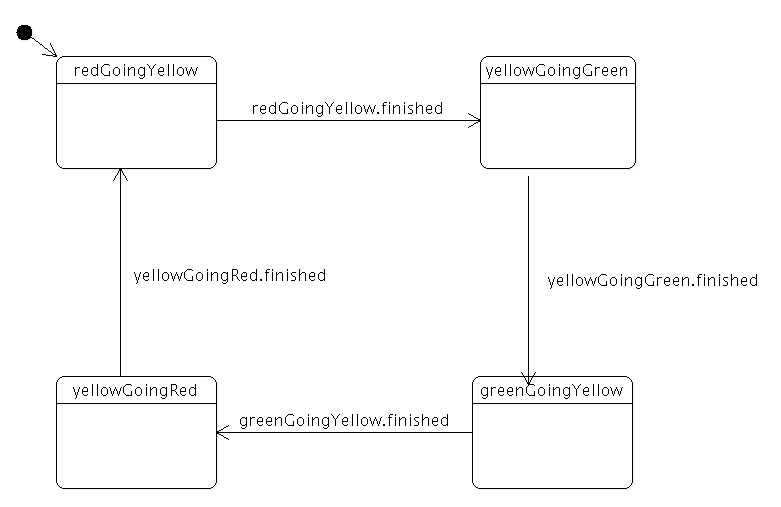
The TrafficLight class combines the TrafficLightWidget with a state machine. The state graph has four states: red-to-yellow, yellow-to-green, green-to-yellow and yellow-to-red. The initial state is red-to-yellow; when the state's timer times out, the state machine transitions to yellow-to-green. The same process repeats through the other states. This is what the statechart looks like:
 int main(int argc, char **argv)
 {
     QApplication app(argc, argv);

     TrafficLight widget;
     widget.resize(110, 300);
     widget.show();

     return app.exec();
 }
The main() function constructs a TrafficLight and shows it. |


