Viadeo Twitter Google Bookmarks ! Facebook Digg del.icio.us MySpace Yahoo MyWeb Blinklist Netvouz Reddit Simpy StumbleUpon Bookmarks Windows Live Favorites 
Logo Documentation Qt ·  Page d'accueil  ·  Toutes les classes  ·  Toutes les fonctions  ·  Vues d'ensemble  · 

Getting to Know Qt Designer

Launching Designer

The way that you launch Qt Designer depends on your platform:

  • On Windows, click the Start button, under the Programs submenu, open the Qt 4 submenu and click Designer.
  • On Unix or Linux, you might find a Qt Designer icon on the desktop background or in the desktop start menu under the Programming or Development submenus. You can launch Qt Designer from this icon. Alternatively, you can type designer in a terminal window.
  • On Mac OS X, double click on Qt Designer in Finder.

The User Interface

When used as a standalone application, Qt Designer's user interface can be configured to provide either a multi-window user interface (the default mode), or it can be used in docked window mode. When used from within an integrated development environment (IDE) only the multi-window user interface is available. You can switch modes in the Preferences dialog from the Edit menu.

In multi-window mode, you can arrange each of the tool windows to suit your working style. The main window consists of a menu bar, a tool bar, and a widget box that contains the widgets you can use to create your user interface.

Qt Designer's Main Window

The menu bar provides all the standard actions for managing forms, using the clipboard, and accessing application-specific help. The current editing mode, the tool windows, and the forms in use can also be accessed via the menu bar.

The tool bar displays common actions that are used when editing a form. These are also available via the main menu.

The widget box provides common widgets and layouts that are used to design components. These are grouped into categories that reflect their uses or features.

Most features of Qt Designer are accessible via the menu bar, the tool bar, or the widget box. Some features are also available through context menus that can be opened over the form windows. On most platforms, the right mouse is used to open context menus.

Qt Designer's Widget Box

The widget box provides a selection of standard Qt widgets, layouts, and other objects that can be used to create user interfaces on forms. Each of the categories in the widget box contain widgets with similar uses or related features.

Note: Since Qt 4.4, new widgets have been included, e.g., QPlainTextEdit, QCommandLinkButton, QScrollArea, QMdiArea, and QWebView.

You can display all of the available objects in a category by clicking on the handle next to the category label. When in Widget Editing Mode, you can add objects to a form by dragging the appropriate items from the widget box onto the form, and dropping them in the required locations.

Qt Designer provides a scratch pad feature that allows you to collect frequently used objects in a separate category. The scratch pad category can be filled with any widget currently displayed in a form by dragging them from the form and dropping them onto the widget box. These widgets can be used in the same way as any other widgets, but they can also contain child widgets. Open a context menu over a widget to change its name or remove it from the scratch pad.

The Concept of Layouts in Qt

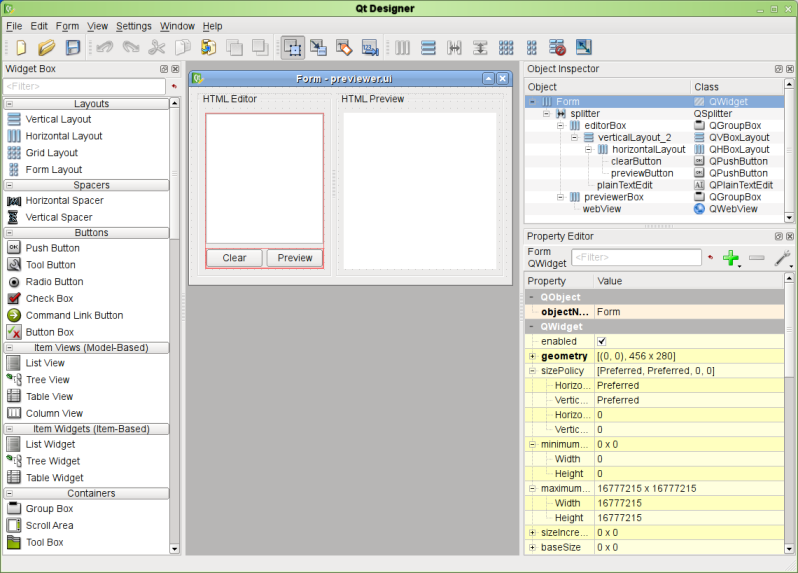
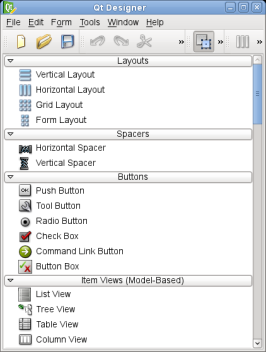
A layout is used to arrange and manage the elements that make up a user interface. Qt provides a number of classes to automatically handle layouts -- QHBoxLayout, QVBoxLayout, QGridLayout, and QFormLayout. These classes solve the challenge of laying out widgets automatically, providing a user interface that behaves predictably. Fortunately knowledge of the layout classes is not required to arrange widgets with Qt Designer. Instead, select one of the Lay Out Horizontally, Lay Out in a Grid, etc., options from the context menu.

Each Qt widget has a recommended size, known as sizeHint(). The layout manager will attempt to resize a widget to meet its size hint. In some cases, there is no need to have a different size. For example, the height of a QLineEdit is always a fixed value, depending on font size and style. In other cases, you may require the size to change, e.g., the width of a QLineEdit or the width and height of item view widgets. This is where the widget size constraints -- minimumSize and maximumSize constraints come into play. These are properties you can set in the property editor. For example, to override the default sizeHint(), simply set minimumSize and maximumSize to the same value. Alternatively, to use the current size as a size constraint value, choose one of the Size Constraint options from the widget's context menu. The layout will then ensure that those constraints are met. To control the size of your widgets via code, you can reimplement sizeHint() in your code.

The screenshot below shows the breakdown of a basic user interface designed using a grid. The coordinates on the screenshot show the position of each widget within the grid.

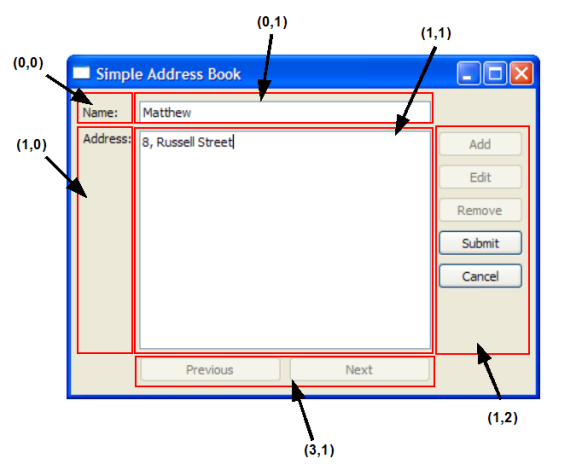
Note: Inside the grid, the QPushButton objects are actually nested. The buttons on the right are first placed in a QVBoxLayout; the buttons at the bottom are first placed in a QHBoxLayout. Finally, they are put into coordinates (1,2) and (3,1) of the QGridLayout.

To visualize, imagine the layout as a box that shrinks as much as possible, attempting to squeeze your widgets in a neat arrangement, and, at the same time, maximize the use of available space.

Qt's layouts help when you:

  1. Resize the user face to fit different window sizes.
  2. Resize elements within the user interface to suit different localizations.
  3. Arrange elements to adhere to layout guidelines for different platforms.

So, you no longer have to worry about rearranging widgets for different platforms, settings, and languages.

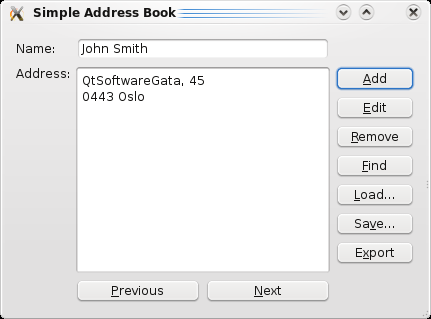
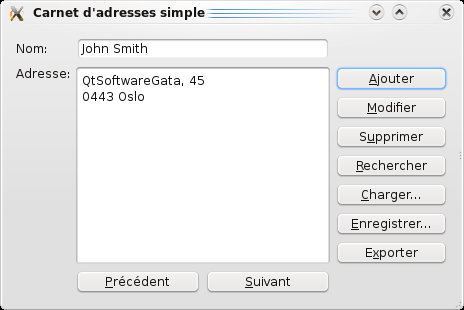
The example below shows how different localizations can affect the user interface. When a localization requires more space for longer text strings the Qt layout automatically scales to accommodate this, while ensuring that the user interface looks presentable and still matches the platform guidelines.

A Dialog in EnglishA Dialog in French

The process of laying out widgets consists of creating the layout hierarchy while setting as few widget size constraints as possible.

For a more technical perspective on Qt's layout classes, refer to the Layout Management documentation.

Publicité

Best Of

Actualités les plus lues

Semaine
Mois
Année

Le Qt Developer Network au hasard

Logo

Utiliser QML et QtWebKit avec PySide

Le Qt Developer Network est un réseau de développeurs Qt anglophone, où ils peuvent partager leur expérience sur le framework. Lire l'article.

Communauté

Ressources

Liens utiles

Contact

  • Vous souhaitez rejoindre la rédaction ou proposer un tutoriel, une traduction, une question... ? Postez dans le forum Contribuez ou contactez-nous par MP ou par email (voir en bas de page).

Qt dans le magazine

Cette page est une traduction d'une page de la documentation de Qt, écrite par Nokia Corporation and/or its subsidiary(-ies). Les éventuels problèmes résultant d'une mauvaise traduction ne sont pas imputables à Nokia. Qt 4.7
Copyright © 2012 Developpez LLC. Tous droits réservés Developpez LLC. Aucune reproduction, même partielle, ne peut être faite de ce site et de l'ensemble de son contenu : textes, documents et images sans l'autorisation expresse de Developpez LLC. Sinon, vous encourez selon la loi jusqu'à 3 ans de prison et jusqu'à 300 000 E de dommages et intérêts. Cette page est déposée à la SACD.
Vous avez déniché une erreur ? Un bug ? Une redirection cassée ? Ou tout autre problème, quel qu'il soit ? Ou bien vous désirez participer à ce projet de traduction ? N'hésitez pas à nous contacter ou par MP !


Partenaires

Hébergement Web