If you have a team working on a large application or several applications, you might want to standardize the way the team members create projects and classes.
You can copy the wizard templates in the template folders to create your own project and class wizards. They are displayed in the New dialog that opens when you choose File > New File or Project.
In a project wizard, you can specify the files needed in a project. You can add wizard pages to allow developers to specify settings for the project.
In a class wizard, you can allow developers to specify the class name, base class, and header and source files for the class.
To see how this works, rename wizard_sample.xml as wizard.xml in the \share\qtcreator\templates\wizards\listmodel\helloworld and \share\qtcreator\templates\wizards\listmodel\listmodels folders. After you restart Qt Creator, the Custom Classes and Custom Projects categories appear in the New dialog.
Overview of Custom Wizards
A custom wizard defines the user interface of a wizard page. The values the user enters in the wizard are assigned field names. Field name and value pairs are then passed to the file creation process. File creation can happen in the following ways:
- Template-based, where source files that contain placeholders for the field names are provided. During processing, the placeholders are replaced by the values from the wizard page. Optionally, modifier characters are applied. For more information, see Processing Template Files.
- Generator script, where a script is called to create the files.
Note: This option mainly exists to accommodate existing generator scripts or cases where complicated algorithmic logic is required when generating files. Writing cross-platform scripts is inherently difficult, and therefore, it is not recommended for new wizards. For more information, see Using Generator Scripts.
Custom wizards are located in subdirectories of the following directories:
- share/qtcreator/templates/wizards
- the local user's configuration folder, $HOME/.config/Nokia/qtcreator/templates/wizards
- %APPDATA%\Nokia\qtcreator\templates\wizards
They contain an XML configuration file called wizard.xml, the template source files, and optionally, the generator script.
Creating Project Wizards
To create a project wizard:
- Make a copy of the share/qtcreator/templates/wizards/helloworld or share/qtcreator/templates/wizards/listmodel folder.
- Modify the wizard_example.xml file.
- The following code determines the type of the wizard and its place in the New dialog:
 <wizard version="1" kind="project"
 class="qt4project" firstpage="10"
 id="A.HelloWorld" category="B.CustomProjects">
- version is the version of the file contents. Do not modify this value.
- kind specifies the type of the wizard: project or class.
- class specifies the type of the project. Currently the only available type is qt4project, which specifies a Qt console project.
- firstpage specifies the place of the new page in the standard project wizard. The value 10 ensures that the custom page appears after the standard pages, as the last page of the wizard.
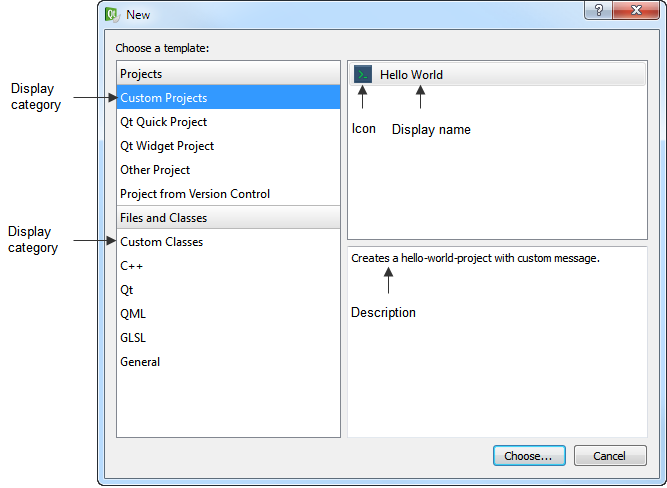
- id is the unique identifier for your wizard. The letter specifies the position of the wizard within the category. The HelloWorld wizard appears as the first wizard in the second category in the New dialog.
- category is the category in which to place the wizard in the list. The letter specifies the position of the category in the list in the New dialog.
- The following code specifies the icon and text that appear in the New dialog:
 <icon>console.png</icon>
 <description>Creates a hello-world-project with custom message.</description>
 <description xml:lang="de">Erzeugt ein Hello-Welt-Projekt mit einer Nachricht.</description>
 <displayname>Hello World</displayname>;
 <displayname xml:lang="de">Hallo Welt</displayname>;
 <displaycategory>Custom Projects</displaycategory>
 <displaycategory xml:lang="de">Benutzerdefinierte Projekte</displaycategory>
- Files to be added to the project:
- Template-based: The following code specifies the files to add to the project:
 <files>
     <file source="main.cpp" openeditor="true" />
     <file source="project.pro" target="%ProjectName%.pro" openproject="true" />
     <file source="icon.png" target="%ProjectName%.png" binary="true" />
- source specifies the file to copy to the project. The files must be located in the wizard folder.
- openeditor indicates that the file is to be opened in an editor after the wizard has finished.
- binary indicates that the file is a binary file (for example, an image file). It is to be copied to the target folder as is. Placeholders are not replaced with values.
- target specifies the new filename for the file. The %ProjectName% variable is replaced with the string that users specify in the Name field on the first page of the wizard.
- openproject indicates that the file is a project file which is to be opened after the wizard has finished.
See also Processing Template Files.
- Generator-script: The following code specifies that the script generate.pl is to be used to create the files:
     <generatorscript binary="generate.pl">
         <argument value="--class-name=%ClassName%"/>
         <argument value="--project-name=%ProjectName%"/>
         <argument value="--header-suffix=%CppHeaderSuffix%" omit-empty="true"/>
         <argument value="--source-suffix=%CppSourceSuffix%" omit-empty="true"/>
         <argument value="--description=%Description%" omit-empty="true" write-file="true"/>
     </generatorscript>
In each argument, the field placeholders are replaced by the field values. There are additional boolean attributes which give fine-grained control:
- omit-empty specifies that complete argument is to be omitted when all placeholders expand to empty values. In the above example, the option --source-suffix will not be passed to the script if the value is empty.
- write-file indicates that instead of the expanded value, the value will be written to a temporary file and its file name will be passed to the script instead. This is useful for multi-line text fields.
See also Using Generator Scripts.
- The following code creates a page that specifies settings for the project:
 <!-- Create a 2nd wizard page with parameters -->
 <fieldpagetitle>Hello World Parameters</fieldpagetitle>
 <fieldpagetitle xml:lang="de">Hallo Welt Parameter</fieldpagetitle>
 <fields>
     <field mandatory="true" name="MESSAGE">
         <fieldcontrol class="QLineEdit" validator='^[^"]+$'  defaulttext="Hello world!" />
         <fielddescription>Hello world message:</fielddescription>
         <fielddescription xml:lang="de">Hallo-Welt-Nachricht:</fielddescription>
     </field>
 </fields>
- fieldpagetitle specifies the title of the page.
- field specifies whether the field is mandatory (true or false). You can use the value of the name field as a variable in other files (for example, %MESSAGE%.
- fieldcontrol specifies the field. class specifies the field type. You can use interface objects from the QWidget class to create fields. This example uses QLineEdit to create an input field.
- validator specifies a regular expression to check the characters allowed in the field.
- defaulttext specifies text that appears in the field by default.
- fielddescription specifies the field name that appears on the wizard page.
Creating Class Wizards
The widget.xml file for a class wizard is very similar to that for a project wizard. The differences are discussed below.
To create a class wizard:
- The following code specifies settings for the wizard:
 <wizard version="1" kind="class" id="A.ListModel" category="B.CustomClasses">

    <description>Creates a QAbstractListModel implementation.</description>
    <description xml:lang="de">Erzeugt eine Implementierung von QAbstractListModel.</description>

    <displayname>QAbstractListModel implementation</displayname>
    <displayname xml:lang="de">Implementierung von QAbstractListModel</displayname>

    <displaycategory>Custom Classes</displaycategory>
    <displaycategory xml:lang="de">Benutzerdefinierte Klassen</displaycategory>
For more information about the elements and their values, see Creating Project Wizards.
- The following code specifies the files to add to the project:
 <files>
     <file source="listmodel.cpp" target="%ClassName:l%.%CppSourceSuffix%"  openeditor="true" />
     <file source="listmodel.h" target="%ClassName:l%.%CppHeaderSuffix%"  openeditor="true" />
 </files>
Here, target contains the following variables that are used to construct the filename:
- %ClassName:l% is replaced with the value of the ClassName field. The modifier l converts the string to lower case, to observe Qt conventions.
- %CppSourceSuffix% and %CppHeaderSuffix% are pre-defined. For more information, see Pre-defined Standard Variables.
 <!-- Create parameter wizard page -->

 <fieldpagetitle>ListModel parameters</fieldpagetitle>
 <fieldpagetitle xml:lang="de">Parameter des ListModel</fieldpagetitle>
 <fields>
     <field name="ClassName">

         <fieldcontrol class="QLineEdit" validator="^[a-zA-Z0-9_]+$" defaulttext="MyListModel" />

         <fielddescription>Class name:</fielddescription>
         <fielddescription xml:lang="de">Klassenname:</fielddescription>
     </field>
     <field name="Datatype">

         <fieldcontrol class="QComboBox" combochoices="QString,int" defaultindex="0" />

         <fielddescription>Data type:</fielddescription>
         <fielddescription xml:lang="de">Datentyp:</fielddescription>
     </field>
 </fields>
In addition to QLineEdit, QComboBox is used in the class wizard to create a field. combochoices specifies the options in the combobox and defaultindex specifies that QString is the default value.
Processing Template Files
When processing a template source file, placeholders specifying the field names in the format %FIELDNAME% are replaced by the values entered by the user. In addition, modifier characters are supported. For example, %FIELDNAME:u% specifies that the value is converted to upper case. This enables generating header guards for C++ header files.
The following modifier characters are supported:
- l for lower case.
- u for upper case.
- c for upper case initial letter ("project" > "Project").
You can use conditions to add sections of the file depending on field values. Use a syntax that is similar to C++ preprocessing, as demonstrated in the profile of the helloworld example:
 @if "%SCRIPT%" == "true"
 QT += script
 @endif
The value of the Boolean (QCheckBox) field labeled SCRIPT determines whether the script module is added. The expressions must expand to valid Javascript expressions after field replacement.
Pre-defined Standard Variables
In addition to the field values entered by the user, you can use the following pre-defined standard values:
- %ProjectName% is replaced by the name of the project in the case of project wizards.
- %Path% is replaced by the path to the target directory. For classes, this is the directory, where the files are created. For project wizards, an additional subdirectory named after the project is created.
- %TargetPath% is replaced by the path to the directory where the actual files are created. For non-project wizards, it is identical to %Path%. For project wizards, it is %Path%/%ProjectName%.
- %CppSourceSuffix% is replaced by the default source suffix, which is defined in Qt Creator in Tools > Options... > C++ > File Naming. For example, if users enter MyClass, the filename becomes myclass.cpp when the project is created.
- %CppHeaderSuffix% is replaced by the default header suffix, which is also defined in File Naming.
Validating User Input
You can specify validation rules for user input. The rules consist of a Boolean JavaScript expression and an error message. The placeholders in them are replaced with values before they are evaluated or displayed.
Consider the following rule used in the Creating Class Wizards example:
 <validationrules>
     <validationrule condition='"%ClassName%" != "QAbstractListModel"'>
         <message>%ClassName% cannot be used as class name.</message>
         <message xml:lang="de">%ClassName% kann nicht als Klassenname verwendet werden.</message>
     </validationrule>
 </validationrules>
It ensures that the class name entered by the user does not match the name of the base class. If the validation fails, a red label displaying the message appears at the bottom of the wizard page.
Using Generator Scripts
The values entered in the wizard page are passed to the script as command line arguments as defined by the wizard configuration file.
In addition, the script must implement a --dry-run command line option.
Qt Creator needs to know the file names before the files are created to check whether files with identical names already exist, for example. Therefore, script file generation is a two-step process:
- Determine file names and attributes: The script is called with the command line --dry-run option and the field values. It then prints the relative path names of the files it intends to create, followed by comma-separated attributes matching those of the <file> element, for example:
     myclass.cpp,openeditor
     myclass.h,openeditor
     myproject.pro,openproject
- Create files: The script is called with the parameters only in the working directory. It then actually creates the files. If directories are needed, the script should create them, too.
The scriptgeneratedproject sample wizard illustrates the usage. A typical script invocation for this example (obtained by running Qt Creator with --customwizard-verbose) looks as follows:
generate.pl --class-name=TestClass --project-name=TestProject --header-suffix=h --source-suffix=cpp --description=/tmp/qtcreatorj26629.txt
By default, the scripts are run in the directory corresponding to %TargetPath%. This can be overriden by specifying the attribute workingdirectory on the element generatorscript. For example, if the script creates the project directory by itself, %Path% can be specified. In that case, --dry-run should output the correct relative paths or absolute paths constructed using the value of %Path%.


