Viadeo Twitter Google Bookmarks ! Facebook Digg del.icio.us MySpace Yahoo MyWeb Blinklist Netvouz Reddit Simpy StumbleUpon Bookmarks Windows Live Favorites 
Logo Documentation Qt ·  Page d'accueil  ·  Toutes les classes  ·  Toutes les fonctions  ·  Vues d'ensemble  · 

Creating Screens

You can use predefined QML elements and your own components to create screens. Typically, the main qml file in a Qt Quick project specifies the main window of an application.

The QML files in the project folder are displayed in QML Components in the Library pane.

You can also use ready-made Qt Quick Components for Symbian and MeeGo Harmattan that allow you to create screens with a native look and feel for the selected mobile platform. You can install the components as part of Qt SDK.

You can dowload QML templates that specify different types of screens from QML Templates for use in your Qt Quick projects. You can open and edit the templates in Qt Designer.

Adding Components to Screens

  1. Drag and drop components from the Library pane to the editor.
  2. Select components in the Navigator pane to edit their properties in the Properties pane.

    For example, you can anchor components to a position on the screen.

Using Data Models

You can create the following types of views to organize items provided by data models:

  • Grid View provides a grid vizualization of a model.
  • List View provides a list vizualization of a model.
  • Path View visualizes the contents of a model along a path.

When you add a Grid View, List View, or Path View element, the ListModel and the delegate component that creates an instance for each item in the model are added automatically. You can edit element properties in the Properties pane or in the code editor. You can also replace the default model and delegate with other, more complex models and delegates in the code editor.

Positioning Items on Screens

You can use the following items to arrange items on screens:
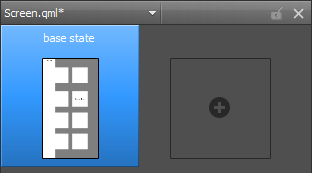
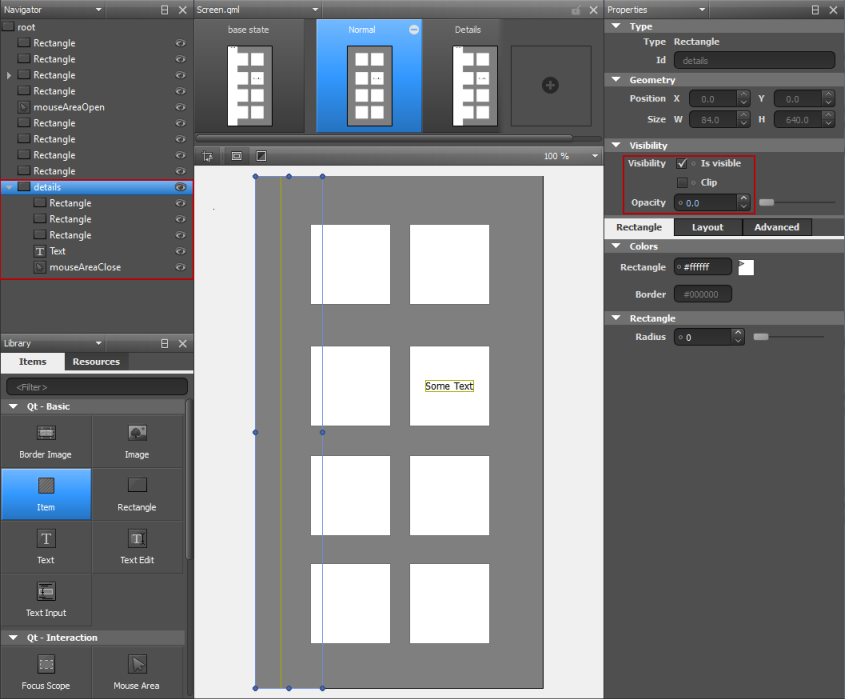
  • Column arranges its child items vertically.
  • Row arranges its child items horizontally.
  • Grid arranges its child items so that they are aligned in a grid and are not overlapping.
  • Flow arranges its child items side by side, wrapping as necessary.

Using States

Use states and transitions to navigate between screens.

QML states typically describe user interface configurations, such as the UI elements, their properties and behavior and the available actions. For example, you can use states to create two screens.

To add states, click the empty slot in the States pane. Then modify the new state in the visual editor.

"States pane"

The properties that you change in a state are highlighted with blue color. In the code editor, you can see the changes recorded as changes to the base state.

To keep the QML code clean, you should create a base state that contains all the elements you will need in the application. You can then create states, in which you hide and show a set of items and modify their properties. This allows you to:

  • Align items on different screens with each other.
  • Avoid excessive property changes. If an item is invisible in the base state, you must define all changes to its child elements as property changes, which leads to complicated QML code.
  • Minimize the differences between the base state and the other states to keep the QML code short and readable and to improve performance.
  • Avoid problems when using transitions and animation when changing states.

To create screens for an application by using states:

  1. In the base state, add all elements you will need in the application. While you work on one screen, you can click the icon to hide elements on the canvas that are not part of a screen.
  2. In the States pane, click the empty slot to create a new state and give it a name. For example, Normal.
  3. In the Properties pane, deselect the Visibility check box or set Opacity to 0 for each element that is not needed in this view. If you specify the setting for the parent element, all child elements inherit it and are also hidden.

    "Designing screens"

  4. Create additional states for each screen and set the visibility or opacity of the elements in the screen.
  5. To determine which view opens when the application starts, use the code editor to set the state of the root item of the .qml file, as specified by the following code snippet:
     Item {
         state: "Normal"
     }
X

Thank you for giving your feedback.

Make sure it is related to this specific page. For more general bugs and requests, please use the Qt Bug Tracker.

[0]; s.parentNode.insertBefore(ga, s); })();
Publicité

Best Of

Actualités les plus lues

Semaine
Mois
Année
  1. « Quelque chose ne va vraiment pas avec les développeurs "modernes" », un développeur à "l'ancienne" critique la multiplication des bibliothèques 64
  2. Apercevoir la troisième dimension ou l'utilisation multithreadée d'OpenGL dans Qt, un article des Qt Quarterly traduit par Guillaume Belz 0
  3. Les développeurs ignorent-ils trop les failles découvertes dans leur code ? Prenez-vous en compte les remarques des autres ? 17
  4. BlackBerry 10 : premières images du prochain OS de RIM qui devrait intégrer des widgets et des tuiles inspirées de Windows Phone 0
  5. Quelles nouveautés de C++11 Visual C++ doit-il rapidement intégrer ? Donnez-nous votre avis 10
  6. Adieu qmake, bienvenue qbs : Qt Building Suite, un outil déclaratif et extensible pour la compilation de projets Qt 17
  7. La rubrique Qt a besoin de vous ! 1
Page suivante

Le Qt Developer Network au hasard

Logo

La création de colonnes dans une ListView en QML

Le Qt Developer Network est un réseau de développeurs Qt anglophone, où ils peuvent partager leur expérience sur le framework. Lire l'article.

Communauté

Ressources

Liens utiles

Contact

  • Vous souhaitez rejoindre la rédaction ou proposer un tutoriel, une traduction, une question... ? Postez dans le forum Contribuez ou contactez-nous par MP ou par email (voir en bas de page).

Qt dans le magazine

Cette page est une traduction d'une page de la documentation de Qt, écrite par Nokia Corporation and/or its subsidiary(-ies). Les éventuels problèmes résultant d'une mauvaise traduction ne sont pas imputables à Nokia. Qt qtcreator-2.3
Copyright © 2012 Developpez LLC. Tous droits réservés Developpez LLC. Aucune reproduction, même partielle, ne peut être faite de ce site et de l'ensemble de son contenu : textes, documents et images sans l'autorisation expresse de Developpez LLC. Sinon, vous encourez selon la loi jusqu'à 3 ans de prison et jusqu'à 300 000 E de dommages et intérêts. Cette page est déposée à la SACD.
Vous avez déniché une erreur ? Un bug ? Une redirection cassée ? Ou tout autre problème, quel qu'il soit ? Ou bien vous désirez participer à ce projet de traduction ? N'hésitez pas à nous contacter ou par MP !


Partenaires

Hébergement Web