Viadeo Twitter Google Bookmarks ! Facebook Digg del.icio.us MySpace Yahoo MyWeb Blinklist Netvouz Reddit Simpy StumbleUpon Bookmarks Windows Live Favorites 
Logo Documentation Qt ·  Page d'accueil  ·  Toutes les classes  ·  Toutes les fonctions  ·  Vues d'ensemble  · 

Customizing Qt Designer Forms

When saving a form in Qt Designer, it is stored as an .ui file. Several form settings, for example the grid settings or the margin and spacing for the default layout, are stored along with the form's components. These settings are used when the uic generates the form's C++ code. For more information on how to use forms in your application, see the Using Forms and Components section.

Modifying the Form Settings

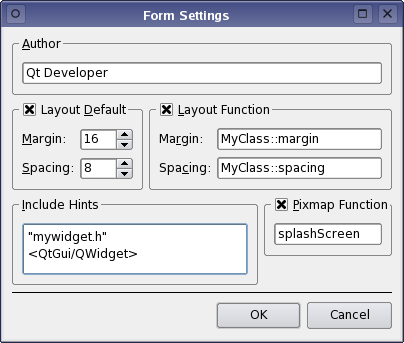
To modify the form settings, open the Form menu and select Form Settings...

In the forms settings dialog you can specify the Author of the form.

You can also alter the margin and spacing properties for the form's default layout (Layout Default). These default layout properties will be replaced by the corresponding Layout Function, if the function is specified, when uic generates code for the form. The form settings dialog lets you specify functions for both the margin and the spacing.

Layout Function

The default layout properties will be replaced by the corresponding Layout Function, when uic generates code for the form.

This is useful when different environments requires different layouts for the same form.

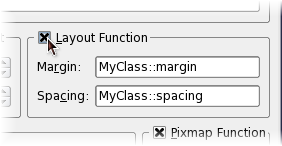
To specify layout functions for the form's margin and spacing, check the Layout Function group box to enable the line edits.

You can also specify the form's Include Hints; i.e. provide a list of the header files which then will be included in the form window's associated .ui file. Header files may be local, i.e. relative to the project's directory, "mywidget.h", or global, i.e. part of Qt or the compilers standard libraries: <QtGui/QWidget>.

Finally, you can specify the function used to load pixmaps into the form window (the Pixmap Function).

[Previous: Using Stylesheets with Qt Designer] [Contents] [Next: Using Custom Widgets with Qt Designer]

Publicité

Best Of

Actualités les plus lues

Semaine
Mois
Année

Le blog Digia au hasard

Logo

Créer des applications avec un style Metro avec Qt, exemples en QML et C++, un article de Digia Qt traduit par Thibaut Cuvelier

Le blog Digia est l'endroit privilégié pour la communication sur l'édition commerciale de Qt, où des réponses publiques sont apportées aux questions les plus posées au support. Lire l'article.

Communauté

Ressources

Liens utiles

Contact

  • Vous souhaitez rejoindre la rédaction ou proposer un tutoriel, une traduction, une question... ? Postez dans le forum Contribuez ou contactez-nous par MP ou par email (voir en bas de page).

Qt dans le magazine

Cette page est une traduction d'une page de la documentation de Qt, écrite par Nokia Corporation and/or its subsidiary(-ies). Les éventuels problèmes résultant d'une mauvaise traduction ne sont pas imputables à Nokia. Qt qtextended4.4
Copyright © 2012 Developpez LLC. Tous droits réservés Developpez LLC. Aucune reproduction, même partielle, ne peut être faite de ce site et de l'ensemble de son contenu : textes, documents et images sans l'autorisation expresse de Developpez LLC. Sinon, vous encourez selon la loi jusqu'à 3 ans de prison et jusqu'à 300 000 E de dommages et intérêts. Cette page est déposée à la SACD.
Vous avez déniché une erreur ? Un bug ? Une redirection cassée ? Ou tout autre problème, quel qu'il soit ? Ou bien vous désirez participer à ce projet de traduction ? N'hésitez pas à nous contacter ou par MP !


Partenaires

Hébergement Web